Categories
IT Blog

Google API Key

Follow these steps to get your Google API key:

  1. Visit https://console.developers.google.com/apis/

    (You may need to log on to your Google account – assuming you have one – first. If not, you’ll have to sign up. We won’t cover that here.)

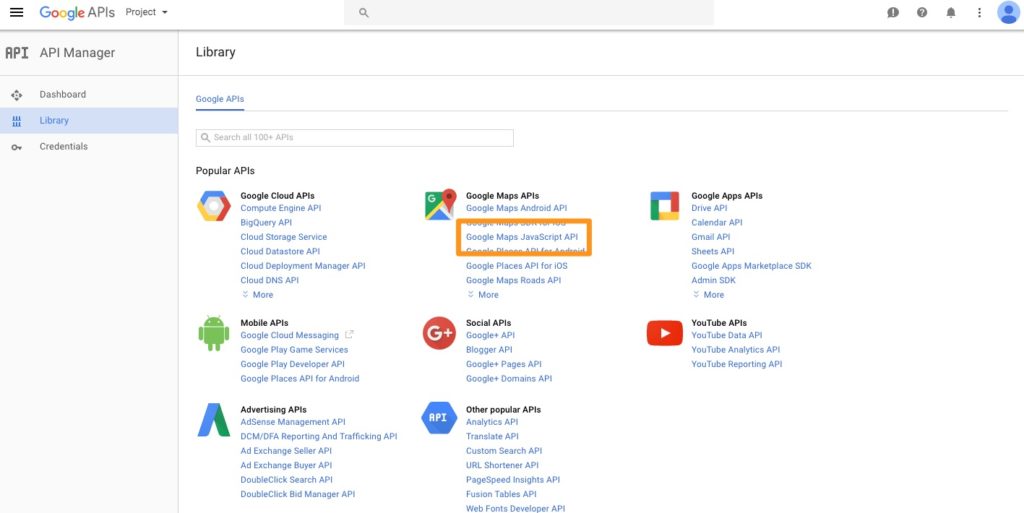
  2.  Click the ‘Google Maps JavaScript API’ link
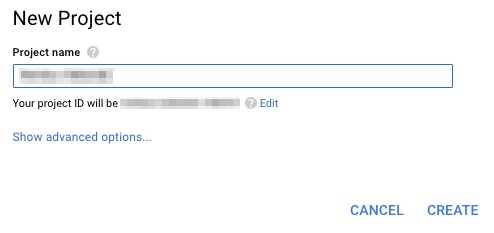
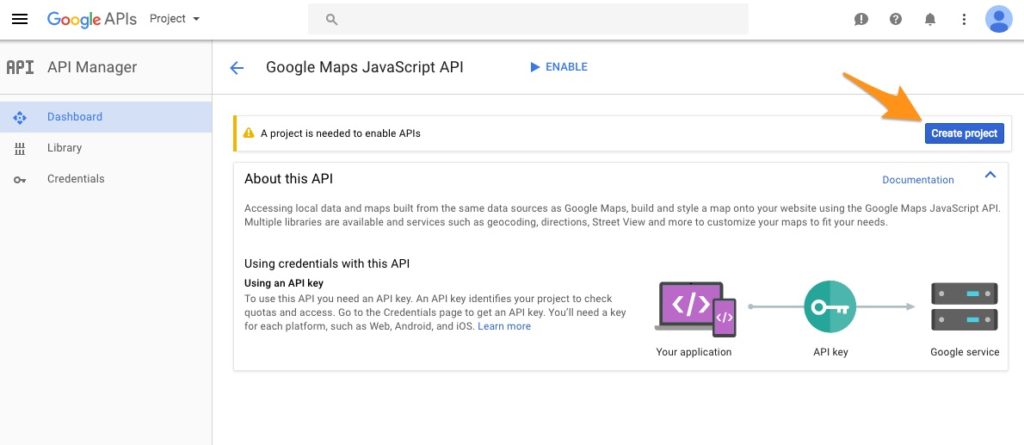
  3. If required, create a project (or select an existing one – see step 4)

    Give the new project a name and click CREATE
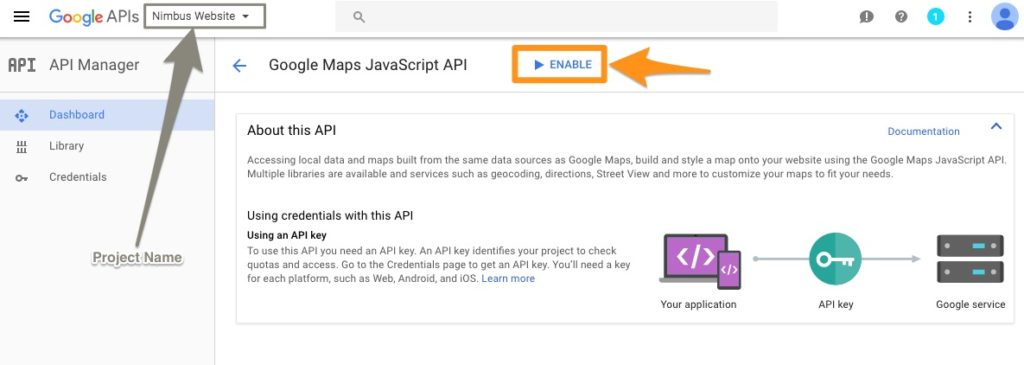
  4. Enable the API
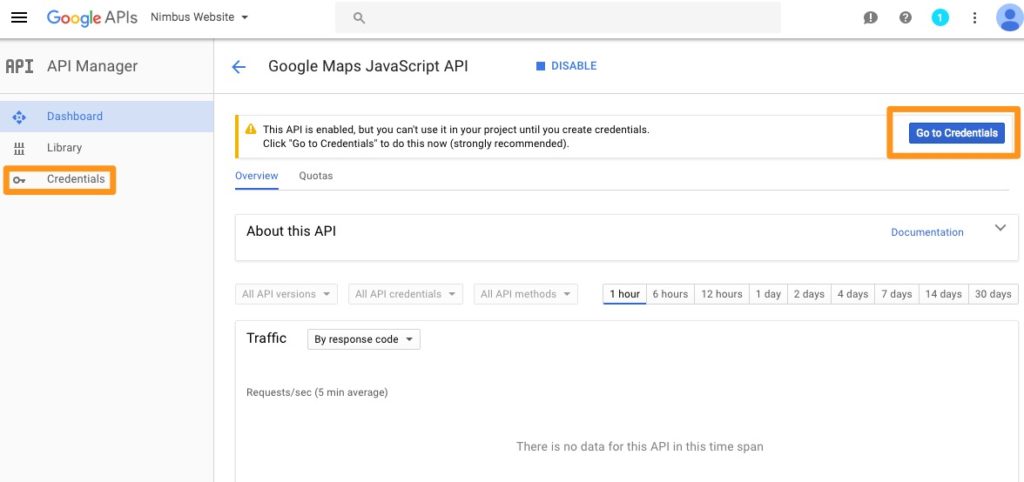
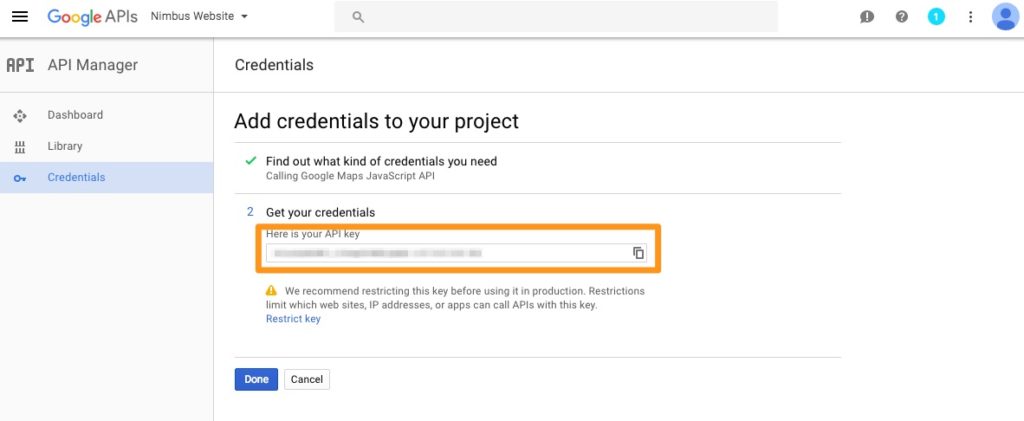
  5. Go to CREDENTIALS
  6. Click ‘Find out what credentials you need?’ and copy the contents of the ‘Here is your API key’ box.

    Your API key should be a long string of characters (upper/lower case and numbers)

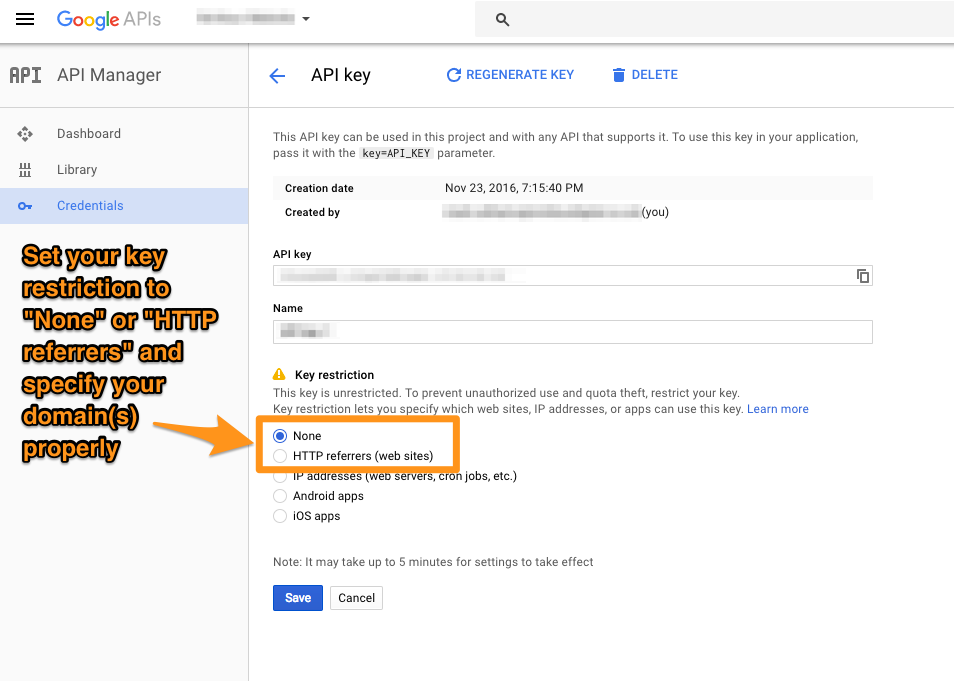
  7. Set restrictions (optional – recommended)

    Your key may not function correctly if you do not fully specify the domain names used to access your site (e.g. yoursite.com & yoursite.net)

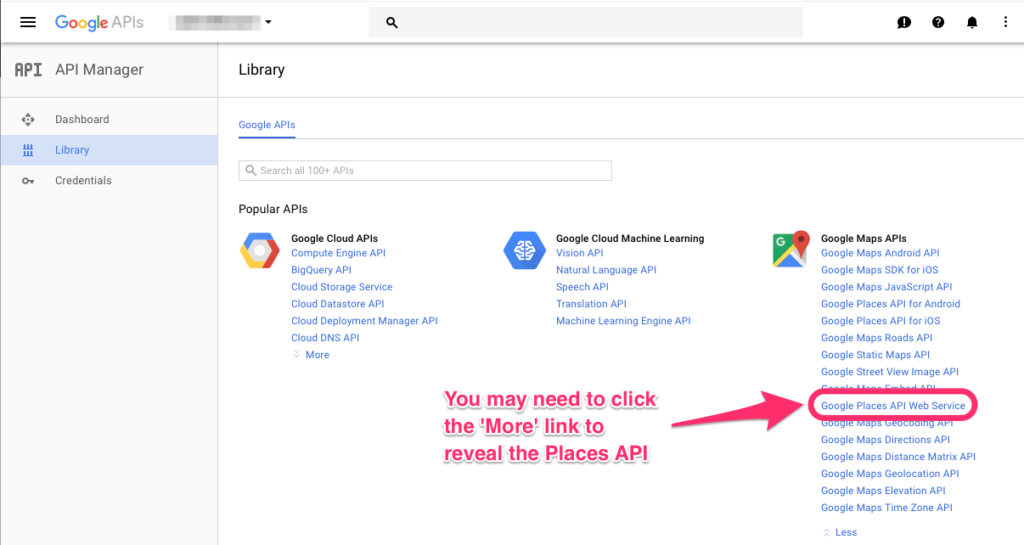
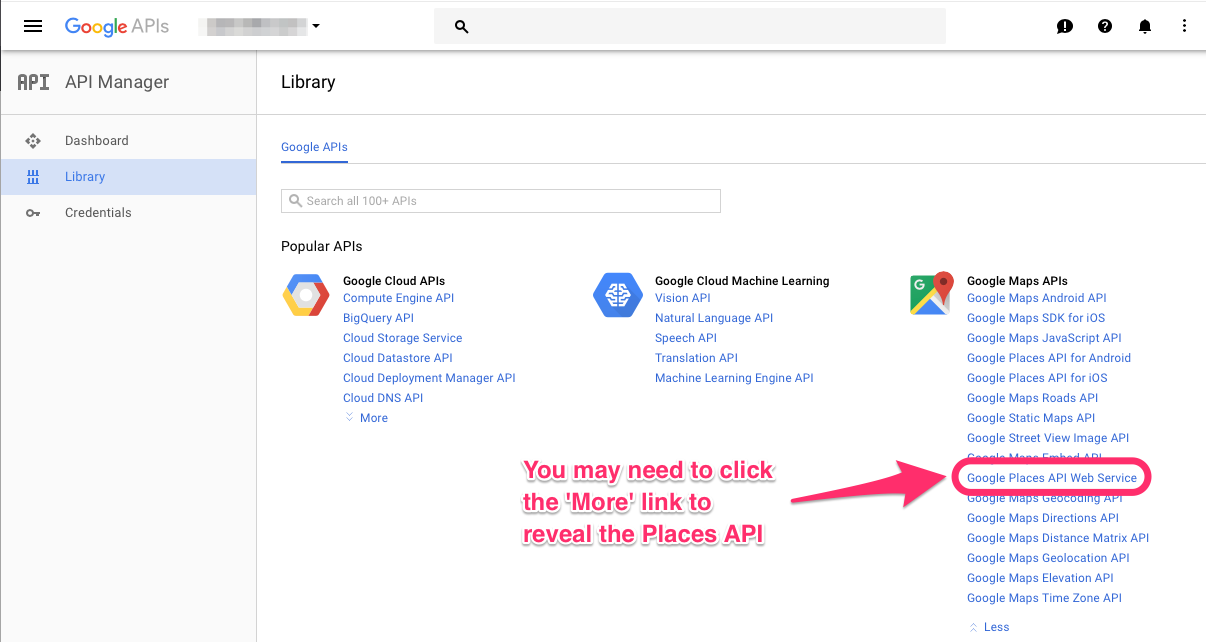
  8. Add the Google Places API Web Service to your project

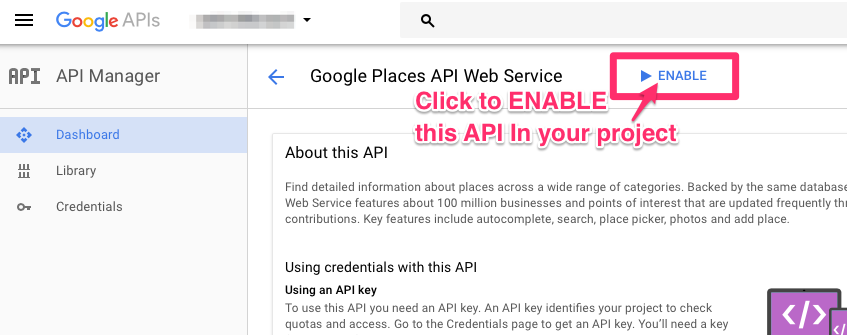
    From your Google Developer Console Dashboard click ‘Enable API‘, then click ‘Google Places API Web Service‘

    Click ‘ENABLE‘ to add to your project:

  9. Be sure to click SAVE at the bottom.
Categories
IT Blog

How Can You Not Have a Website Yet?

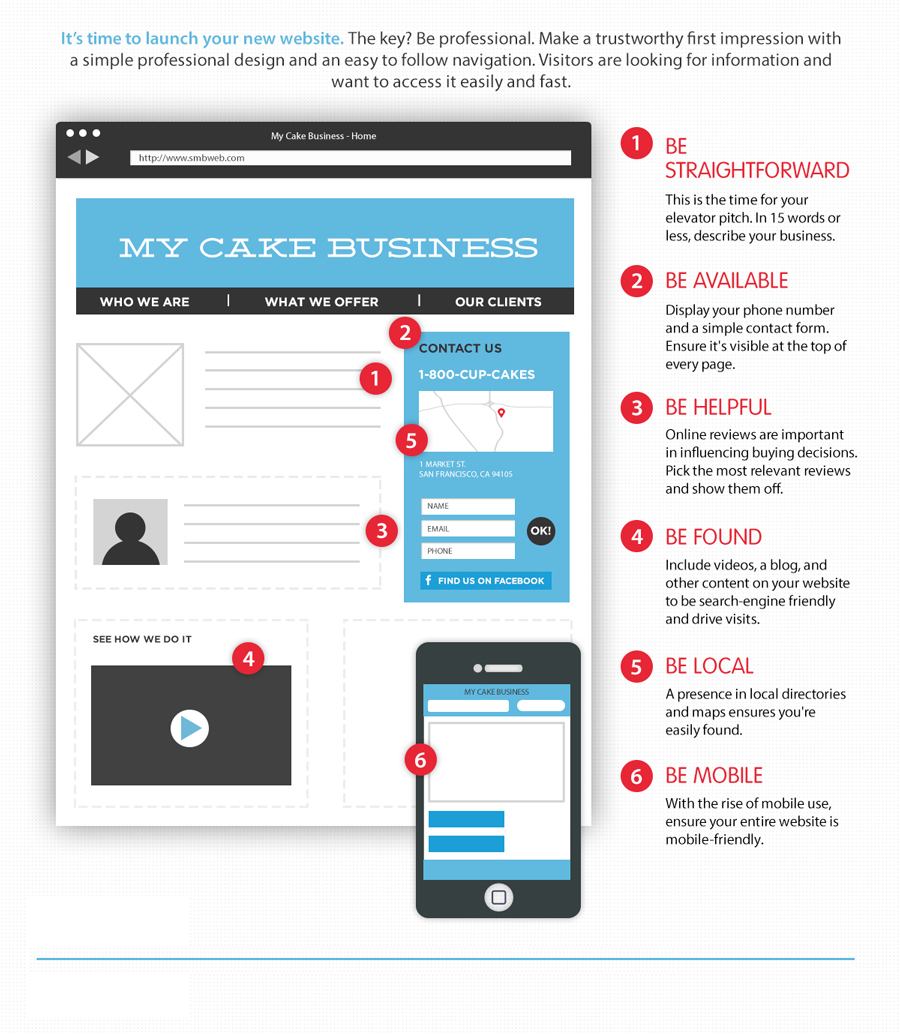
It’s hard to believe, but as 2017 dawns, a sizeable percentage of small business owners still don’t have websites. Even among those who do, many of their websites are less effective than they could be. Is yours one of them?

In a recent Capital One study, just 56 percent of small businesses say they have a company website. Of those, only 53 percent of their websites are mobile-optimized.

This kind of statistic makes me want to tear my hair out.

If your small business doesn’t have a website, here are some of the many ways you’re missing out:

Your email marketing is less effective than it could be.

Last week, I reported that about half of people who get a marketing email from a business will visit the business website as a result. If you don’t have a website, they could go to your social media page—but can they actually make a purchase there? In most cases, no.

  • You’ll get less traction in search results.

If consumers search for your business online and you don’t have a website, your company name and address may show up (if you have a presence on local search directories, that is). But where do customers go to learn more about your business? Without a website to click on, they’ll be taking their chances if they decide to visit you.

  • You’re at the mercy of social networks.

Social networks change their algorithms and policies all the time. What if a new change makes your business’s social media accounts less visible in users’ feeds? It’s happened to plenty of Facebook users as Facebook has adjusted its algorithm over the years. Worse yet, what if the social network you’re reliant on loses its luster? (Think MySpace.) If you build your marketing presence on a website that you control, rather than on someone else’s turf, your investment of time, energy and money, it is much more secure.

  • You look less than legitimate.

Personally, I am very leery of doing business with any company that doesn’t have a website. Consumers these days like to get as much information as they can about businesses before making a decision to patronize them. Without a website, your business is shrouded in mystery. . . and not in a good way. You look either hopelessly out of date, or like you’ve got something to hide.

Beyond all these factors, one reason to create a business website is that there’s no longer an excuse not to.

It’s more affordable and easier than ever before to set one up for just pennies a day. All you have to do is visit one of the many one-stop services that offer web hosting, web design and/or DIY website templates you can use to create your own website. As a bonus, many of these services make it easier to market your website by helping you with search engine optimization, local search directories and more once your website is up and running.

Your business website doesn’t have to be fancy, either.

If you own, say, a local dry cleaner, a couple of pages with your basic information (hours, address, phone number), perhaps a Contact Us page, and links to your business elsewhere online (social media, reviews, etc.) are really all you need.

When asked what would most improve their businesses in 2017, 32 percent of small business owners in the Capitol One survey cited “increasing advertising and marketing.” But just 14 percent said “creating a website.” These days, however, a website should be the basis of your advertising and marketing efforts. Without one, you can’t hope to compete effectively.

Author: Rieva Lesonsky

Need help planning your business website and using it effectively as a marketing tool? please don’t hesitate to contact us http://www.lastsolutions.com.au/

Categories
Setup email

Adding Email Addresses to a Safe Sender List

Whitelist email addresses from specific senders to prevent communications ending up in your spam folder

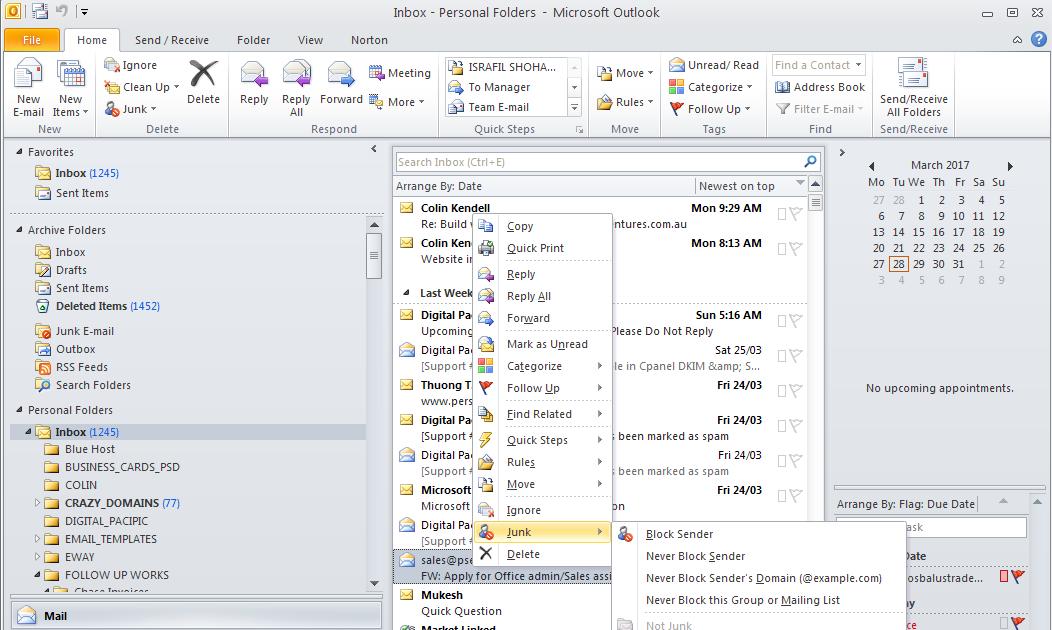
You can allow emails from specific addresses to reach your inbox without being placed in your junk or spam folder by whitelisting those email addresses and adding them to a safe senders list.

Each program has different steps for adding an email address to a safe senders list. Please click on the link for the software you have and follow the instructions. Keep in mind that, if you’re instructing your contacts to add you to their safe sender lists, have them add the email address you use in your From Email Address line.

  • Gmail
  • MacMail
  • McAfee SpamKiller
  • Mozilla Thunderbird
  • MSN
  • Norton AntiSpam
  • Outlook
  • Outlook.com (Formerly Hotmail)
  • Yahoo

Gmail

To ensure that you receive emails in your inbox, you can add the email address to your contact list. If one of our mails has been moved to the spam folder, you can mark it “Not Spam” to whitelist it.

1.    Select contacts from the options on the left side of the Gmail Inbox.

2.    Select Create Contact on the top menu.

3.    Enter the email address in the primary email box.

4.    Select Save.

MacMail

1.    Open the email.

2.    Ctrl-click the sender’s email address and select “Open in Address Book.”

3.    Verify the sender’s contact details.

4.    Click Save.

McAfee SpamKiller

1.    Click Friends.

2.    Click Add.

3.    Enter your contact’s domain.

4.    Click OK.

MSN

1.    Select Settings: Email | Junk e-mail (bottom left, just above Calendar).

2.    From the E-mail settings screen, select Junk E-mail Guard.

3.    Select Safe List.

4.    Enter the email address.
Example: You can either enter a specific email address or use *xxxxx.com or @xxxxx.com to whitelist the domain (replace the xxxxx with the domain name).

5.    Select Add.

Mozilla Thunderbird

1.    Check if your contact’s email is in your Junk folder, right-click on the email and choose “Mark As Not Junk”.

2.    Click Address Book.

3.    Make sure that the Personal Address Book is highlighted.

4.    Click New Card, the New Card window will display.

5.    Under the Contact tab, copy your contact’s “From” address and paste it into the Email dialog box.

6.    Click OK.

Norton AntiSpam

AntiSpam works along with Outlook, Outlook Express, Netscape and Yahoo, MSN/Hotmail to block spam mails before it reaches your inbox. To make sure emails reach you, you can add us to your Personal Friends list or Global Friends list. Here is how you can do that:

1.    Start Norton AntiSpam, select Status & Settings tab.

2.    Select AntiSpam.

3.    Select Configure button – right hand side bottom of the screen.

4.    Select Allowed List tab – second tab on the list of tabs.

5.    Select Add.

6.    Enter email address in the Email address box.

7.    Select OK.

Outlook

For 2003, 2007 and Express – Without an example email address in your inbox:

1.    Select Actions from the toolbar at the top of the screen.

2.    Select Junk E-mail.

3.    Select Junk E-mail Options…

4.    Click the Safe Sender tab.

5.    Click Add.

6.    Type in the email address you wish to add to your safe sender list.

7.    Click OK.

For 2003, 2007 and Express – With an example email address in your inbox:

1.    Open the email.

2.    In the Toolbar options at the top, click the Safe Lists drop-down.
Note: This is located in the “Junk Email” section

3.    Select “Add sender to Address book”.

4.    Click OK.

For 2003, 2007 and Express – To white list an entire domain:

1.    Open the email.

2.    In the Toolbar options at the top, click the Safe Lists drop-down.
Note: This is located in the “Junk Email” section

3.    Select “Add Sender’s Domain (@example.com) to Safe Senders List.

4.    Click OK.

For 2010

1.    In Outlook, go to the Home tab.

2.    Click the Junk button.

3.    Choose “Junk E-Mail Options” from the drop-down list.

4.    Go to the Safe Senders tab.

5.    Type in either the email address or the domain name you wish to add.

6.    Click OK.

For 2013

1.    In Outlook, go to the Home tab.

2.    Click Junk > Junk Email Options.

3.    Select the Safe Senders Tab and click Add.

4.    In the Add address or domain box, enter the email address or the domain name you want to whitelist.

5.    Click OK and close the window.

Express

1.    In Outlook, go to the Tools menu.

2.    Select “Address Book”.

3.    Click New and select New Contact from the drop-down menu.

4.    Type in email address and include any details you want.

5.    Click OK.

Outlook.com (Formerly Hotmail)

1.    Open your Outlook mailbox.

2.    Select Options from the top right (next to the question mark).

3.    Select More options > Safe and blocked senders (under Preventing junk email) > Safe senders.

4.    In the space provided, enter the address.
Example: You can either enter a specific email address or use *xxxxx.com or @xxxxx.com to whitelist the domain (replace the xxxxx with the domain name).

5.    Select Add to list.

6.    Ensure the safe mailing lists box has the address you entered, and select OK.

Yahoo

In Yahoo Mail, your Contacts list is your whitelist. To add the From Address to your Yahoo Contacts:

1.    Open your Yahoo mailbox.

2.    Click the address book icon under the Yahoo! Mail logo. When you roll your mouse over it, it will say Contacts.

3.    Click “New Contact”.

4.    Fill in the fields of your Contact.

5.    Click Save.

Mail from this sender should now be delivered to your Inbox.
 

Categories
IT Blog Setup email

Delete Email from iPhone or iPad

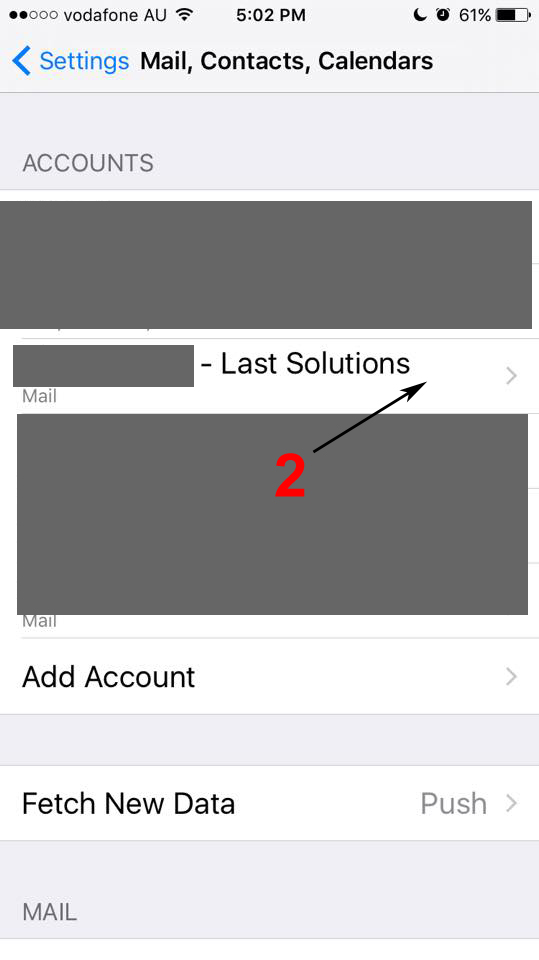
1. From Settings: Tap on “Mail, Contacts, Calendars”
1

2. Tap on email account you want to change

2-new

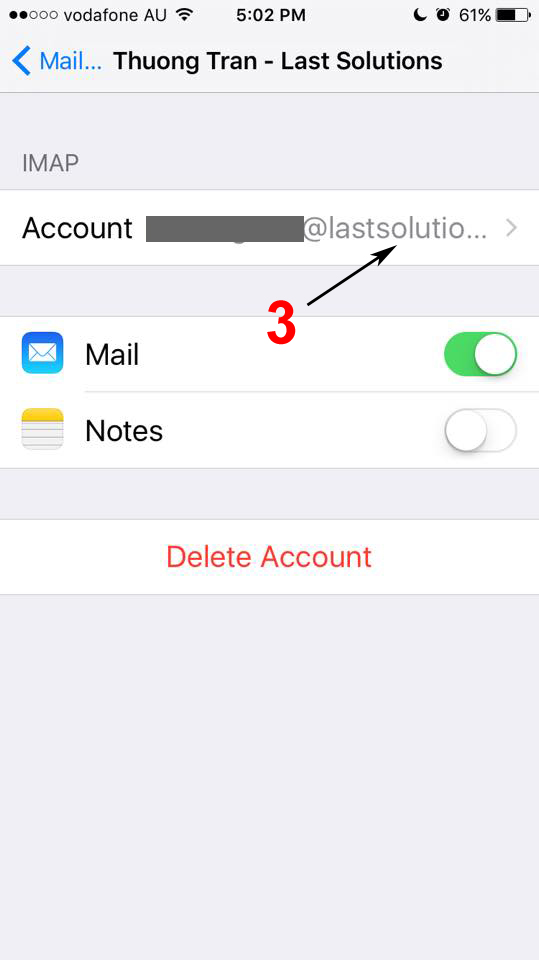
3. Tap on Account email ….

3-new

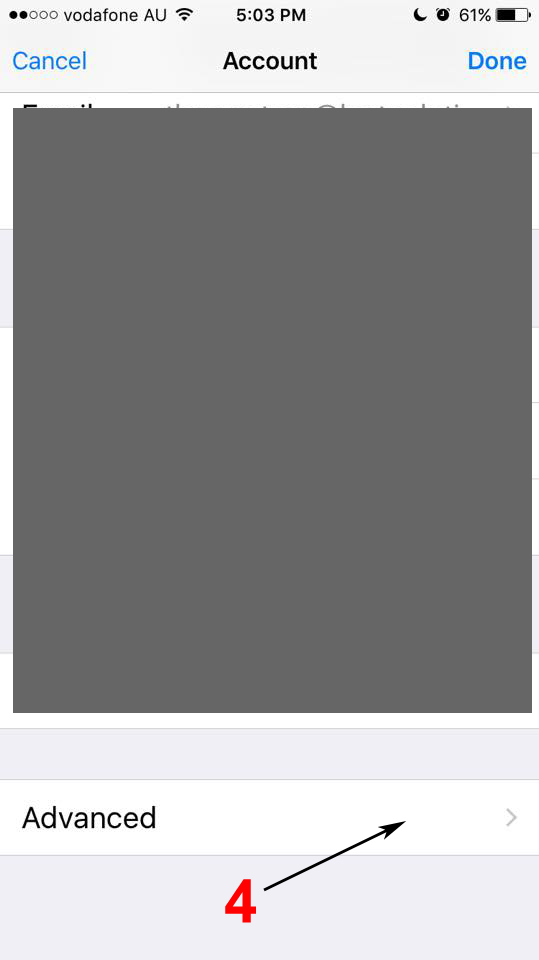
4. Tap on “Advanced” at the bottom

4-new

5. Tap on “Deleted Mailbox” under MAILBOX BEHAVIOURS

5

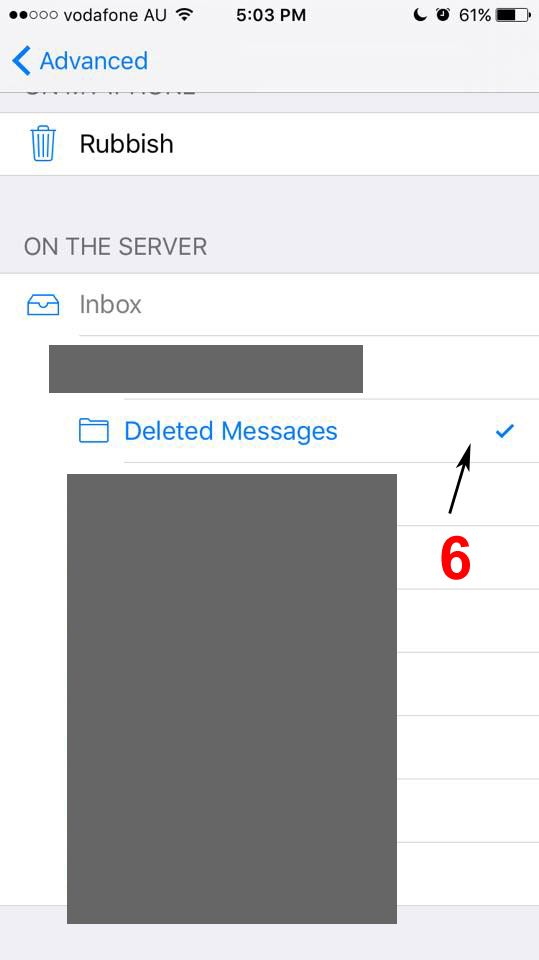
6. Tap on “Deleted Messages” under ON THE SERVER to make sure having a tick as picture

6-new

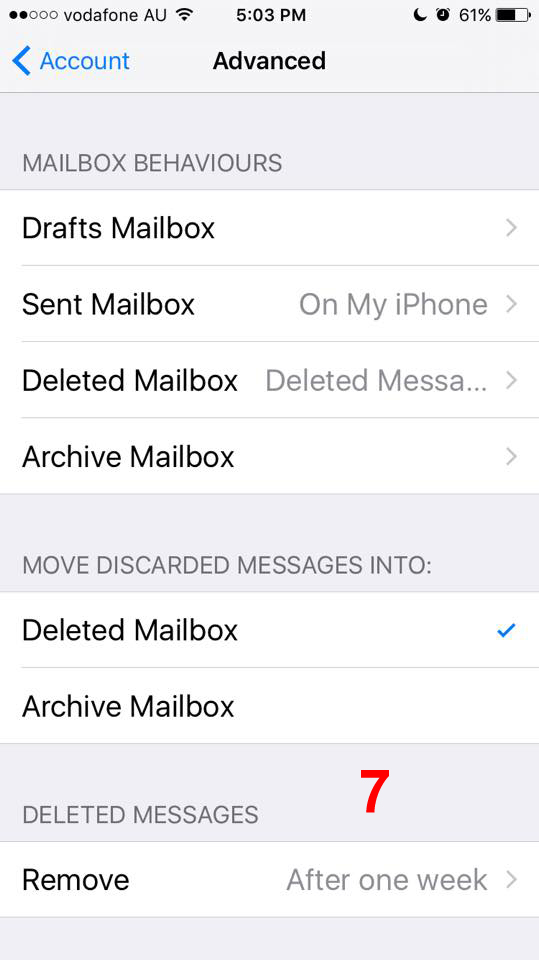
7. Tap on “Advanced” at top left on picture 6 to go back.

You will see as picture 7, Deleted Mailbox: Deleted Messages


7-new


8. Tap on “Account” at top left on picture 7 to go back

Tap “Done”


You should quit your email program or turn off and then turn on your phone 


Categories
IT Blog Setup email

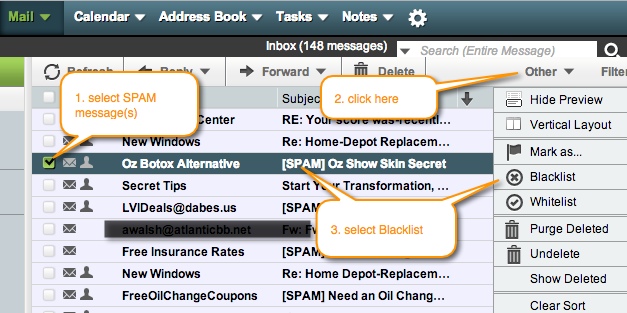
How Can I Blacklist / Block Spam Emails at Horde Webmail?

Login to your webmail account (http://www.yourdomain.com/webmail);

  1.  Select SPAM message(s)
  2.  Click Other tab
  3.  Select Blacklist

blacklist-spam-mesages-horde-webmail

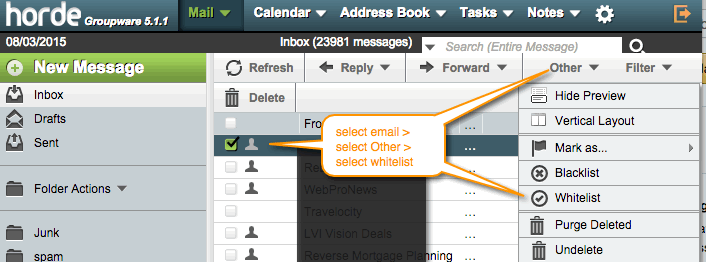
How to WhiteList Emails

You can whitelist email addresses that you want to make sure you receive and do not want them filtered by your spam filter.

how-to-whitelist-webmail

Categories
IT Blog Setup email

How to change Email Outgoing Server Port to MS Outlook

If you can’t send email out it’s because SMTP Server Outgoing port is changed.

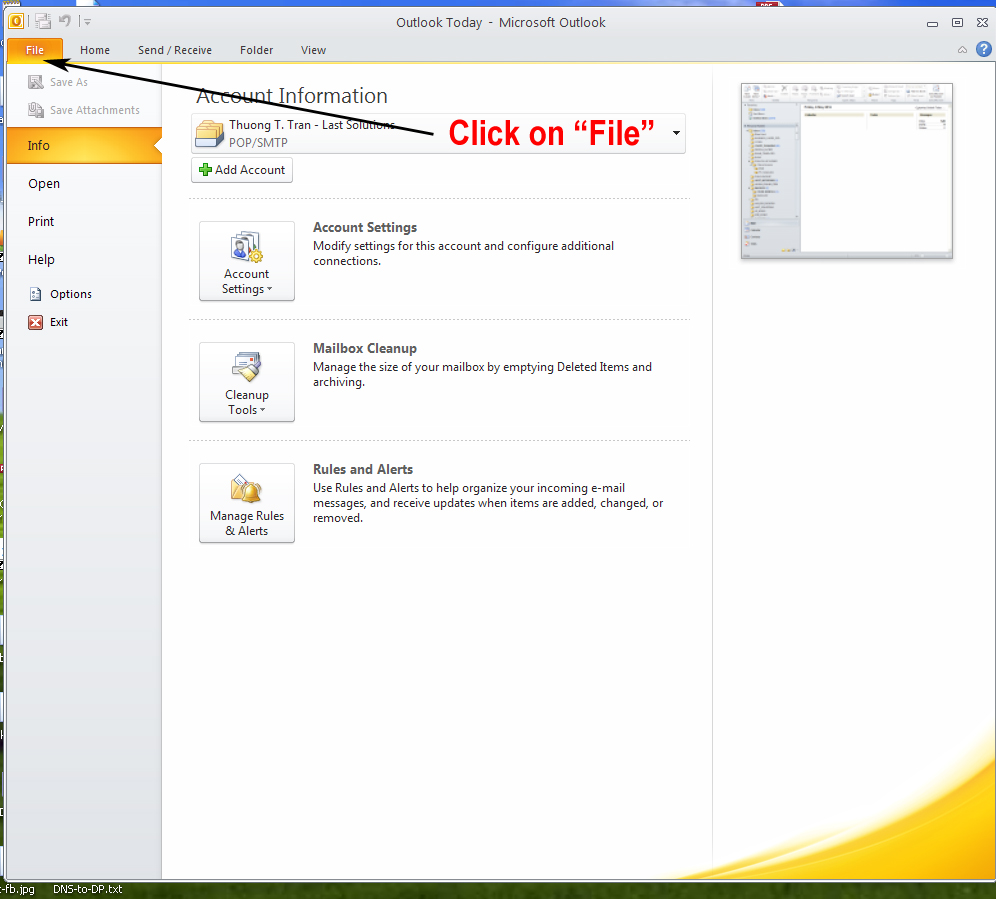
The following will show you how to change this port to MS Outlook.

1. Click on “File” menu from MS Outlook menu bar on the top

how-to-change-outgoingserver-port1

Picture 1

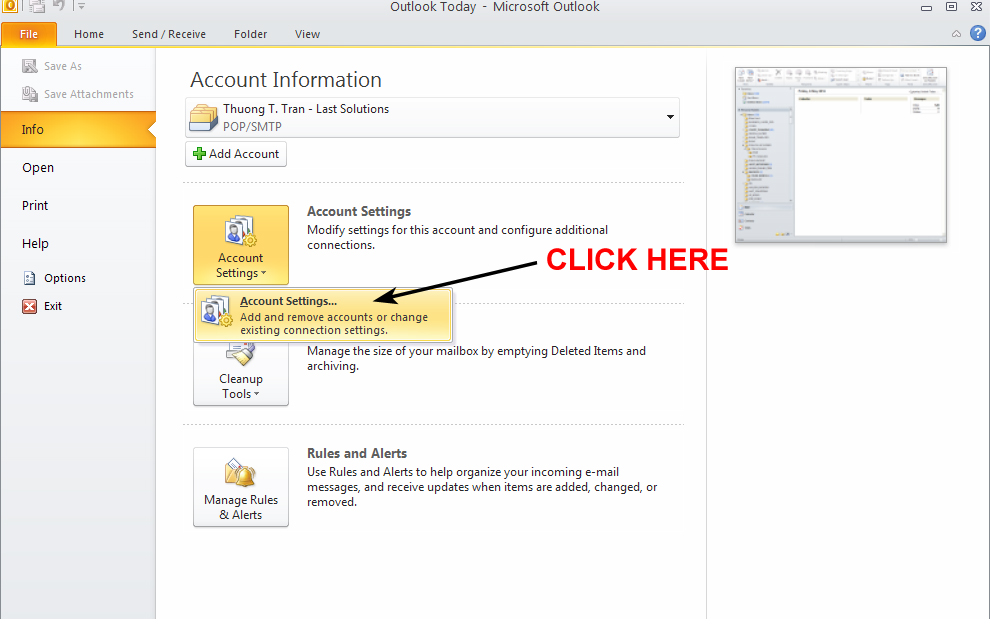
2. Click on “Account Setting …” button & “Account Settings ..” dropdown box.
how-to-change-outgoingserver-port2

Picture 2

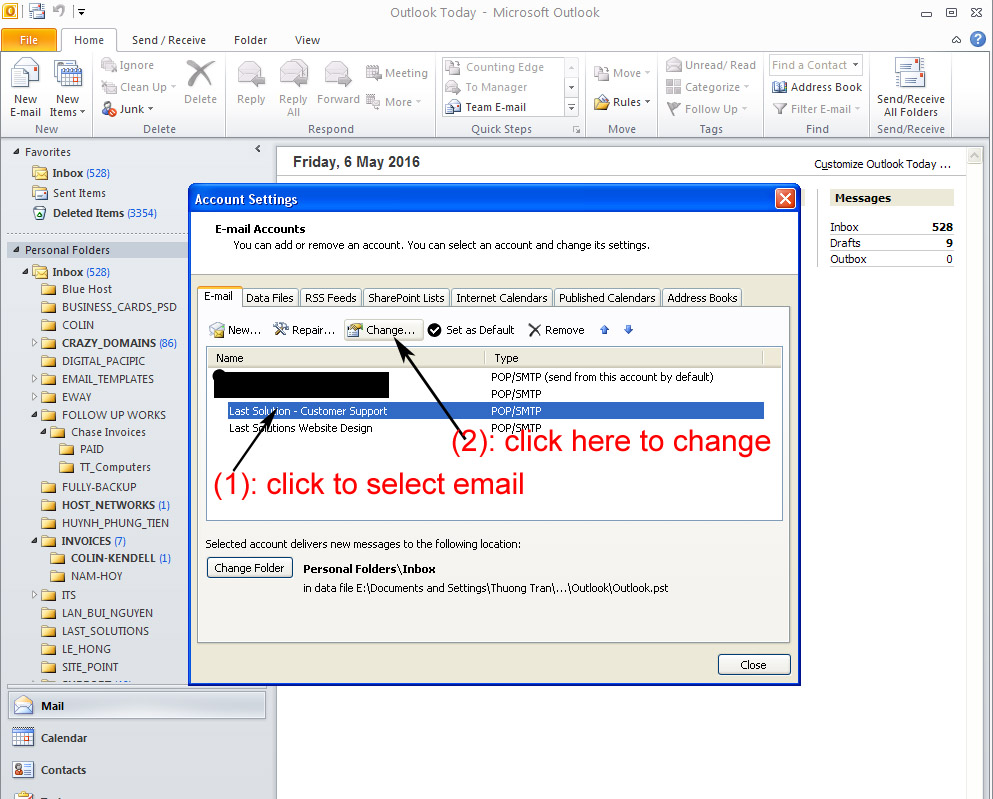
3. Click to select Email you want to change (1) and then “Change ..” (2)
how-to-change-outgoingserver-port3

Picture 3

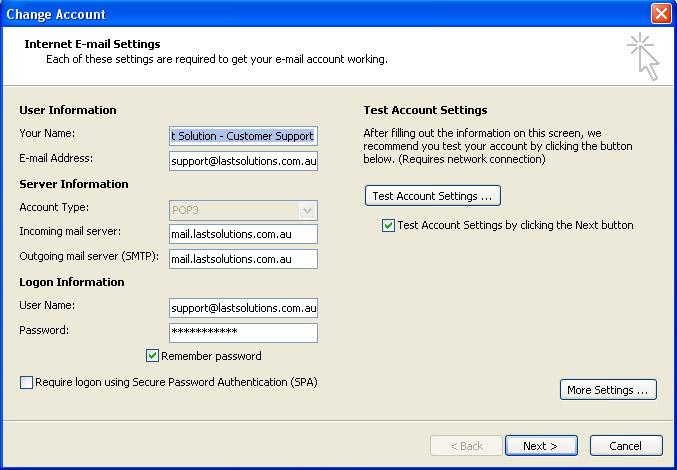
4. Click on “More Settings …”

how-to-change-outgoingserver-port4

Picture 4

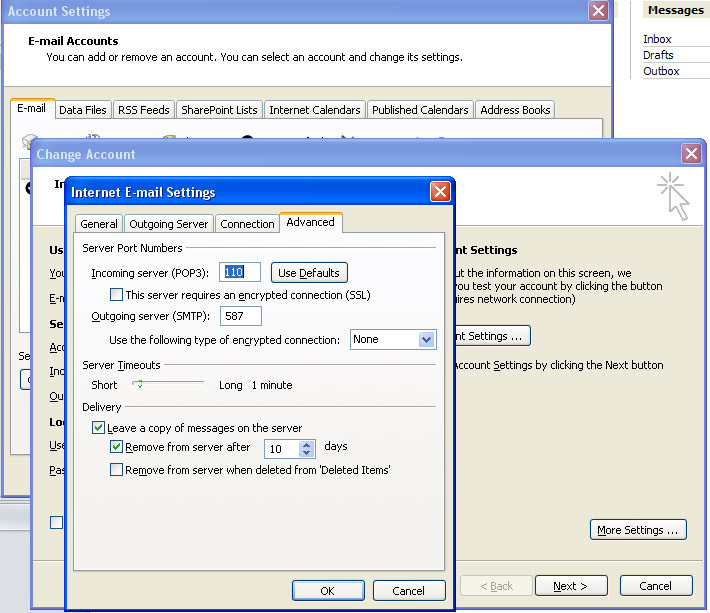
5. Change Outgoing server (SMTP) to 587

how-to-change-outgoingserver-port5

Picture 5

Categories
IT Blog

How to Create an Email Autoresponder in Webmail

What is an AutoResponder?

An autoresponder is a feature within your email settings that allows you to automatically send a response when an email is sent to a specific email address.

When should I use an AutoResponder?

It’s really up to you when to use the autoresponder feature. Typically, businesses will use the autoresponder feature to let others know when they are out of the office, to confirm receipt of an email, and to acknowledge and thank customers for an order that may have been placed.

STEPS to Setup an AutoResponder in Webmail:

Step 1:

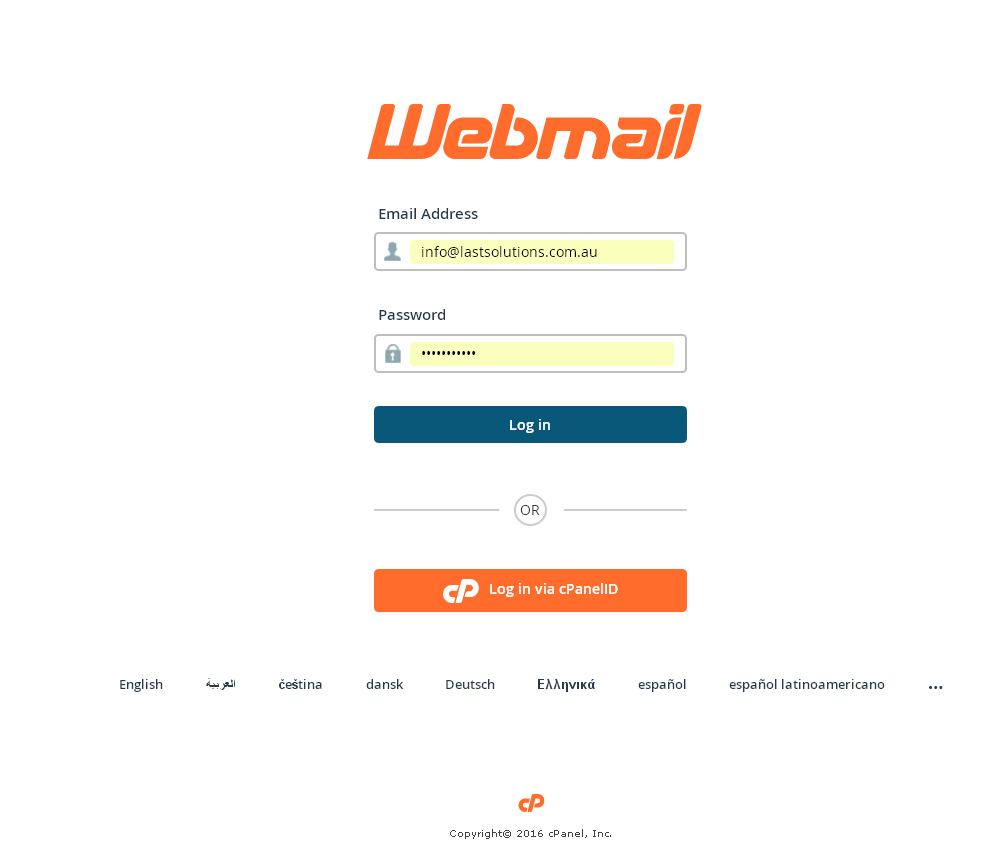
Login to Webmail.

Enter www.<yourdomainname>/webmail into address bar of browser

Example: <yourdomainname> is lastsolutions.com.au

autoreply1

Enter your email address & password

Click “Login

autoreply2


Step 2:

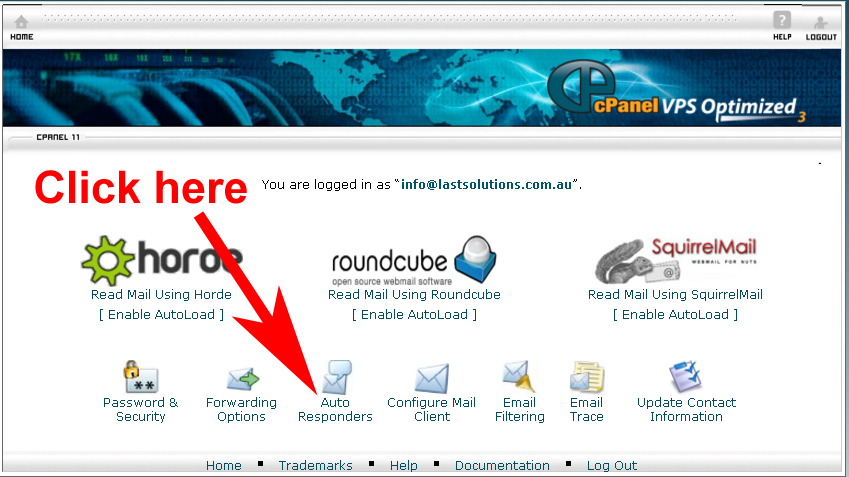
Click the Auto Responders button on the bottom of the page.

autoreply3

Step 3:

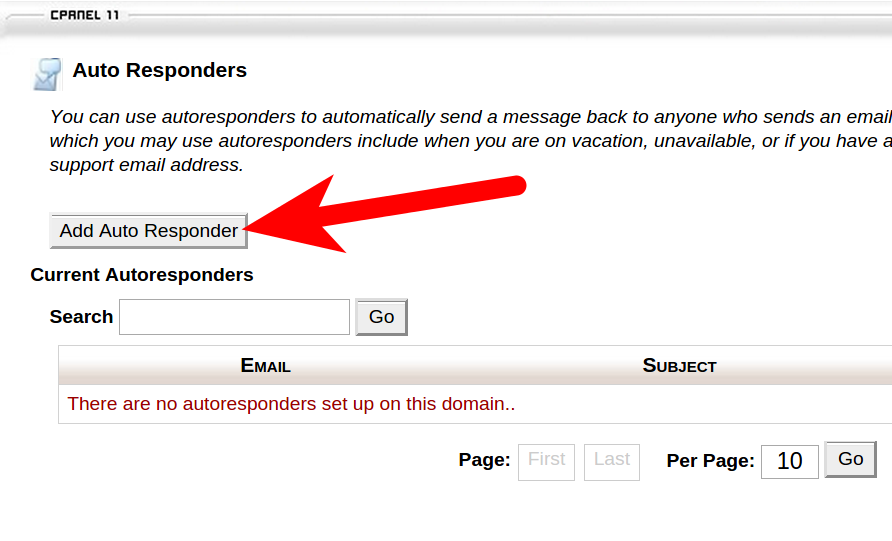
Click the Add Auto Responder button.

adding-auto-responder

Step 4:

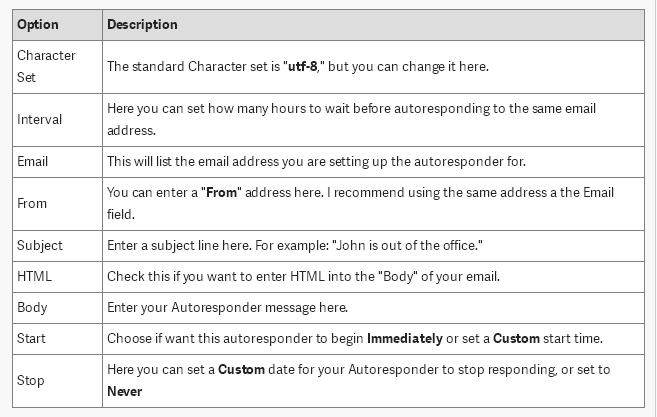
You will now be able to fill in the fields to setup your AutoResponder. Below is a brief description of the available options.

autoreply4

Step 5:

Click the Create/Modify button to save your changes.

Categories
IT Blog

Why should you keep your site up to date?

WordPress was fast becoming the world’s most popular CMS and taking security very seriously. It was now being used to power sites for organisations like government and media for which security was a serious concern, and that it was now a very secure and stable platform on which to put their small business site.

Why You Should Keep Your Site Updated

There are five main reasons for keeping every aspect of your WordPress site up to date, which are:

  • Security
  • Performance
  • Bug fixes
  • Compatibility
  • Features

Each of these is important for different reasons, but it can be argued that security is the most important of all.

Keeping Your Site Updated Will Enhance Security

One of the reasons that WordPress is increasingly becoming the target of security attacks is because it’s so big. A CMS that powers up to a quarter of the internet will doubtless attract the attention of anyone wanting to insert malicious code, take sites down or steal data. But the very size of WordPress, and of its community of users and developers, is also an asset here.

Security vulnerabilities are spotted and dealt with quickly. This applies to WordPress core as well as to the biggest and most popular plugins. The fact that WordPress is open source means that anyone finding a problem can identify the cause of that problem and alert the right people straightaway, whether that be via the WordPress site or by alerting a plugin developer.
With smaller and lesser used plugins, and those that aren’t well supported, this is less the case. But the fact that all plugins are open source means that even if the plugin developer doesn’t fix the problem, someone else can.

All of this means that when a security vulnerability comes to light in WordPress core or in a major plugin, it can be quickly fixed, and an update released straightaway.

None of this will benefit you unless you keep your version of WordPress and your plugins and themes up to date. I’ll come to how you do this later in this post, and recommend some plugins that can help. But if you don’t install the updates, you’re vulnerable to security problems, and you’re the only one to blame.

An Updated Site Will Perform Better

Updates aren’t just for security. Often they’ll improve the performance of WordPress itself, or of a plugin or theme.

For example, WordPress 4.1 included improvements to complex queries to improve the performance of sites using these, and WordPress 3.9 included improvements to the performance of TinyMCE. Plugins also get updates to improve performance, perhaps to speed up scripts or queries or run more efficiently.

So keeping your WordPress version and your plugins up to date will help your site perform at its best.

Updating Can Eliminate Bugs

Aside from security patches, a reason for minor WordPress releases (the ones with a X.X.X version number, rather than X.X which is a major release) is to fix bugs.

Major releases tend to be very stable and bug-free thanks to the meticulous development cycle and the legions of people helping with testing, but sometimes a bug will slip through the net, and a minor release will come out to fix it. For example release 3.8.3 fixed a bug with the “Quick Draft” tool which was broken.

Plugins and themes are the same: Make sure you install updates in case they fix bugs that could be affecting your site.

Updates Can Enhance Compatibility

After a major WordPress release, a lot of plugins will get an update to ensure compatibility with the new version, or to make use of new features. Sometimes a plugin won’t need to be updated as it remains compatible, but the developer should check that it’s compatible and update its compatibility information which you see in the plugin repository.

Occasionally you might find that an update to WordPress or to a plugin results in compatibility problems with another plugin, which is why it’s important to back up your site before updating.

Updates Can Introduce New Features

Keeping your site up to date also gives you access to new features. For example, recent releases of WordPress have included big improvements to the UX of the admin screens as well as accessibility improvements. Plugins can do this too, which means that keeping things up to date gives you access to the latest goodies.

By Rachel McCollin

Categories
IT Blog

Accept Credit Card Payment on website with PayPal

Website Payments Standard.

wps_hero_overlay_1x

Summary:

With Website Payments Standard, you integrate our payment buttons into your website to turn it into an online store. Your customer checks out through the PayPal site, then we return them to your site.

How it works:

Customers add items to your shopping cart on your website and are taken to a PayPal payment page on PayPal website.
They choose to pay by card or log in to PayPal where they can choose from their linked cards or bank accounts.
They enter or select their shipping address, confirm the payment and return to your website.

Fees:

It’s just 2.6% + $0.30^ per sale, with no monthly fees. As your sales volume increases, you can become eligible for lower rates. Pay to PayPal

Website Payments Pro – Hosted Solution

Summary:

  • An all-in-one solution to handle all your payment needs
  • Accept Visa, MasterCard and PayPal payments
  • Your customers don’t need a PayPal account to pay
  • Integrate with your existing cart or use APIs

How it works:

  1. Your customer chooses an item and decides to pay with a card.
  2. They enter their information on an unbranded, PayPal-hosted page.
  3. The payment is processed and your customer receives confirmation.

Fees:

Get both Website Payments Pro – Hosted Solution and Virtual Terminal for just $25 a month plus transaction fees (~$0.30, detail  https://www.paypal.com/au/webapps/mpp/paypal-seller-fees ). Pay to PayPal

Categories
IT Blog Setup email

Set Up E-mail on an Android Phone

Learn how to set up your business e-mail account yourname@yourcompany.com.au (this is example email address, you need to replace with your real business email) on your Android smartphone, allowing you to send and receive e-mails wherever you go. The images used in this guide reflect Android OS 4.4 (KitKat).

Newer operating systems

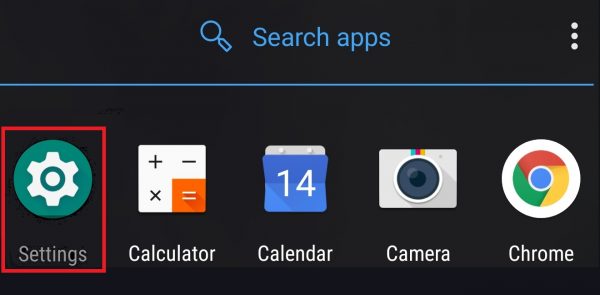
Step 1 – Find the Settings app and open it.

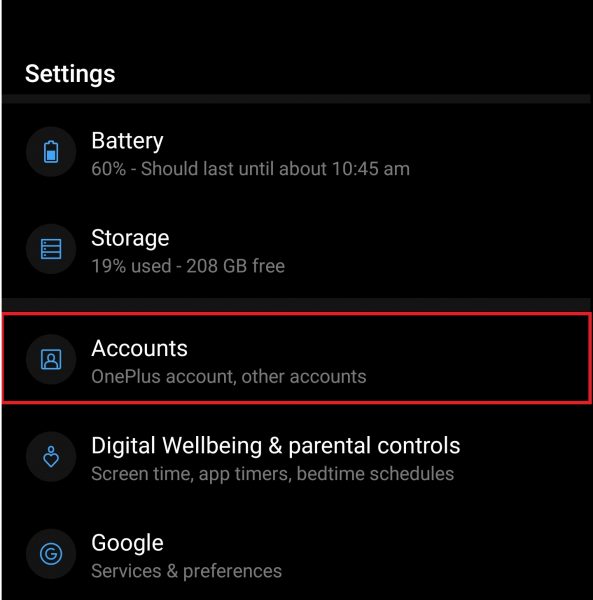
Step 2 – Select Accounts.

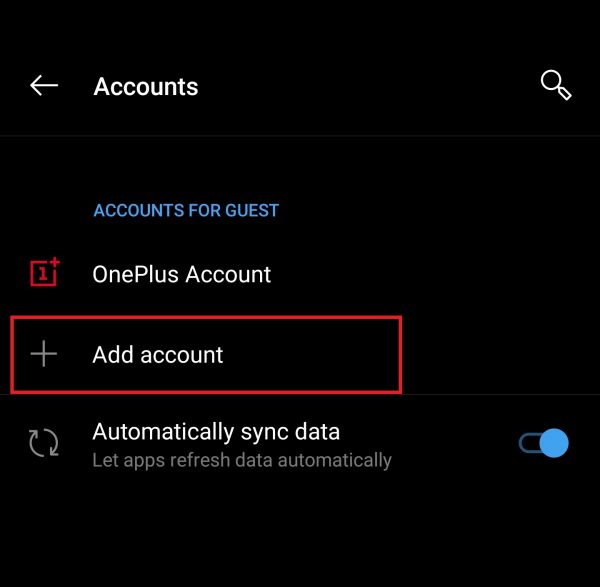
Step 3 – Select Add Account.

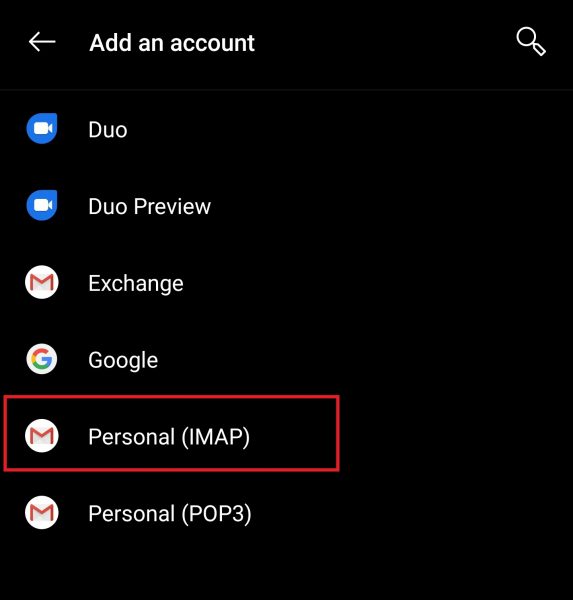
Step 4 – Select Personal (IMAP).

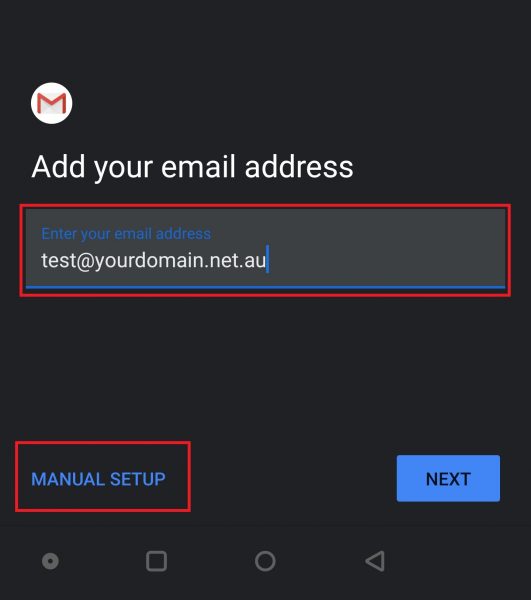
Step 5 – Add your email address, then select MANUAL SETUP.

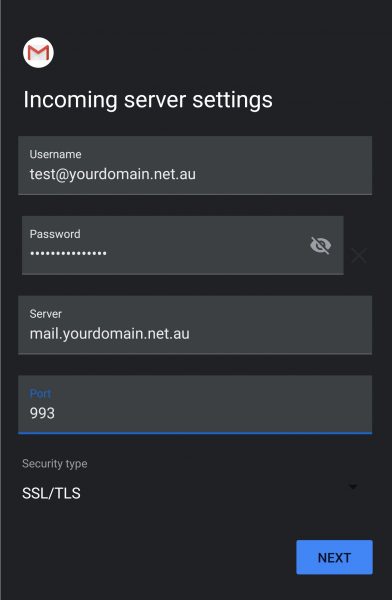
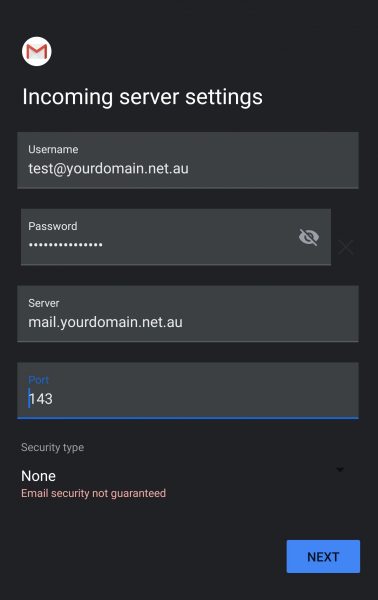
Step 6 – Enter your Username, Password, and the incoming mail server settings found here, then select Next.

Note: On rare occasions, due to some network settings on your router/firewall or on an outdated mail client, the SSL settings above don’t work. If you continue having problems, try these Non-SSL settings instead.

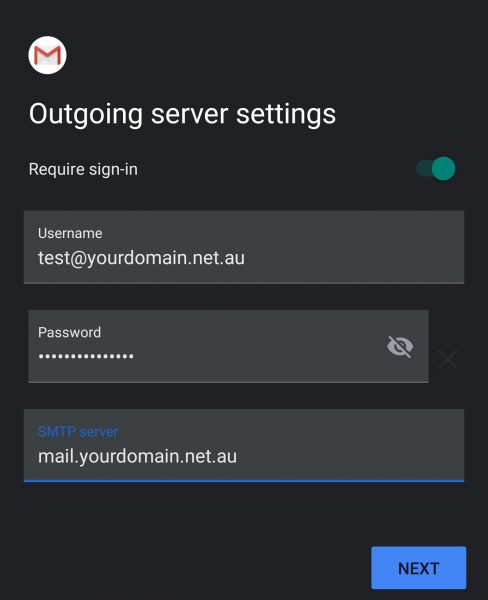
Step 7 – Enter your Outgoing server settings.

Usually the SMTP server port is autoconfigured, but if not use port 465 for SSL (default) or port 587 for non-SSL.

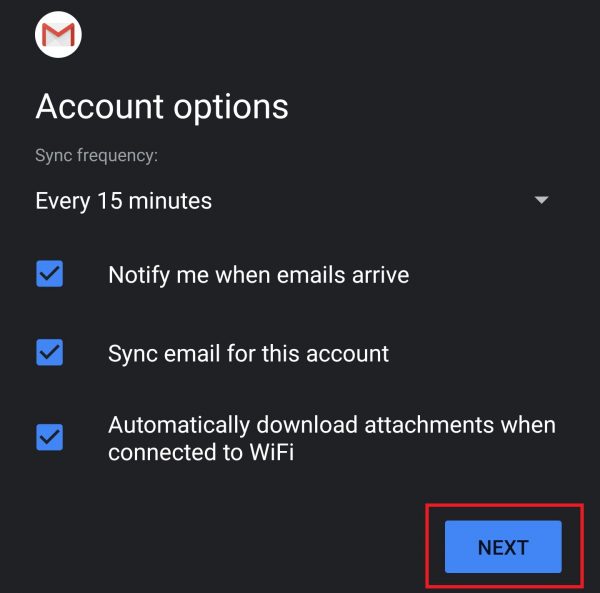
Step 8 – Leave these settings as default and select Next.

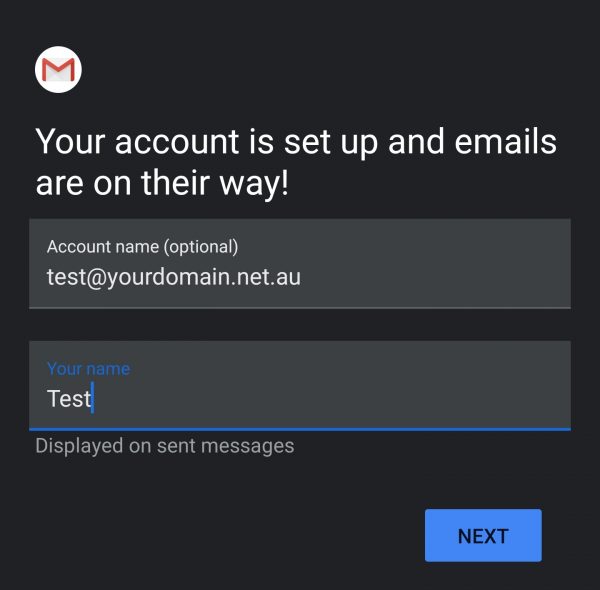
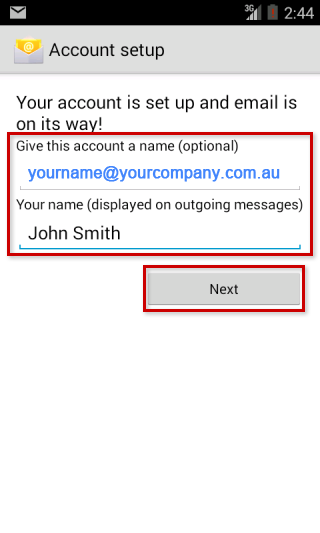
Step 9 – Enter in a name for your email account, and select Next.

Step 10 – Close the App completely,

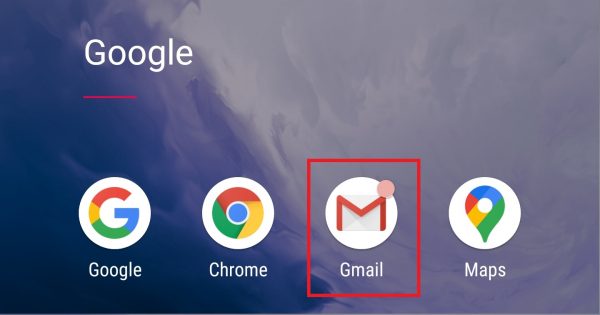
then open the default Gmail app and try sending an email from / to your email address (e.g. from john@yourdomain.net.au to john@yourdomain.net.au). If you can receive emails on the phone, your incoming settings are correct. If you can send mail from the phone, the outgoing mail settings are correct as well.

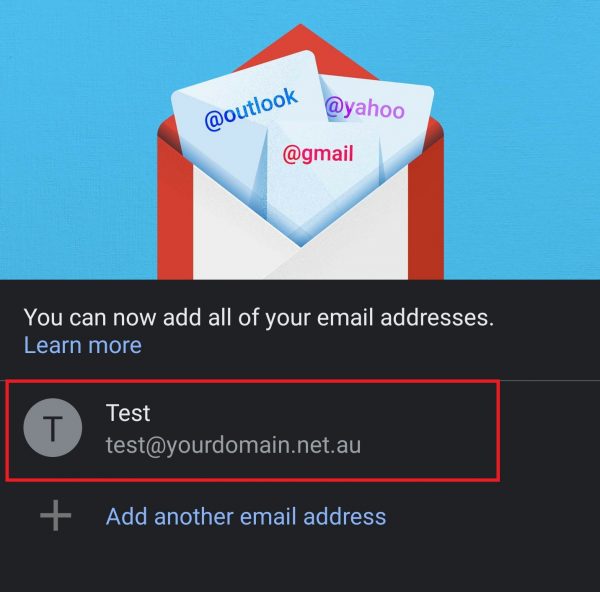
You are also able to add email accounts from within the Gmail app directly, by selecting Add Another Email Address. Otherwise, select the email address to start managing your emails.

Older operating systems

Step 1

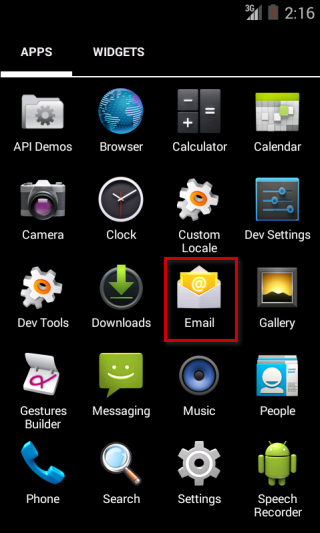
Find and click Email on your Android phone.

scr_setup_android_email_01

The Email icon is located on the apps page

Step 2

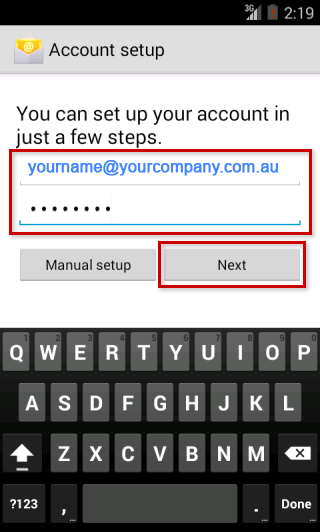
Enter your email address and password and then press Next.scr_setup_android_email_02

The basic settings screen

Step 3

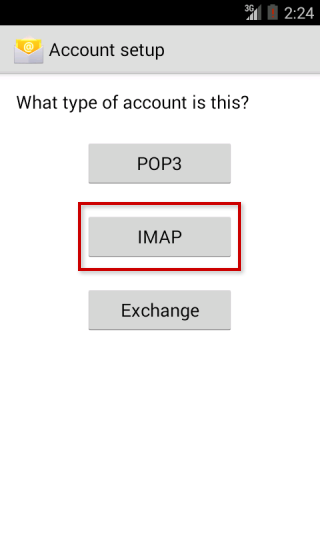
Select IMAP.

scr_setup_android_email_03

The account type selection screen

Step 4

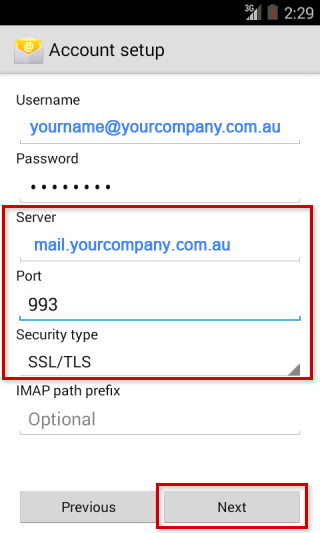
Enter the following incoming server information and press Next when finished:

scr_setup_android_email_04

The incoming server settings screen

Step 5

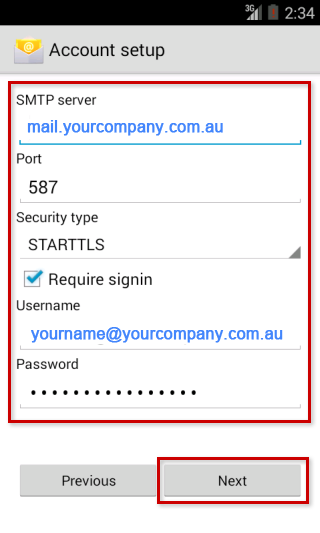
Enter the following outgoing server information and press Next when finished:

 scr_setup_android_email_05

The outgoing server settings screen

Step 6

Give this account a name and enter Your name. It is suggested to use your e-maill address as the account name to differentiate it from any other e-mail accounts you may set up on your phone.

scr_setup_android_email_06

The final settings screen

Step 7

You can now click the Email icon again to access your 1&1 e-mail account on your phone.

scr_setup_android_email_01

The Email icon is found on the apps screen

The setup is complete. Your phone should download and display your recent e-mails in the application

Categories
IT Blog Setup email

How To Setup An Imap Email Account On Your Iphone

This tutorial will show you how to setup an IMAP email account on your iPhone.

Enter your real login details:

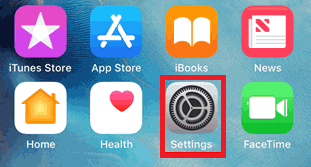
Step 1 – Click on Settings.

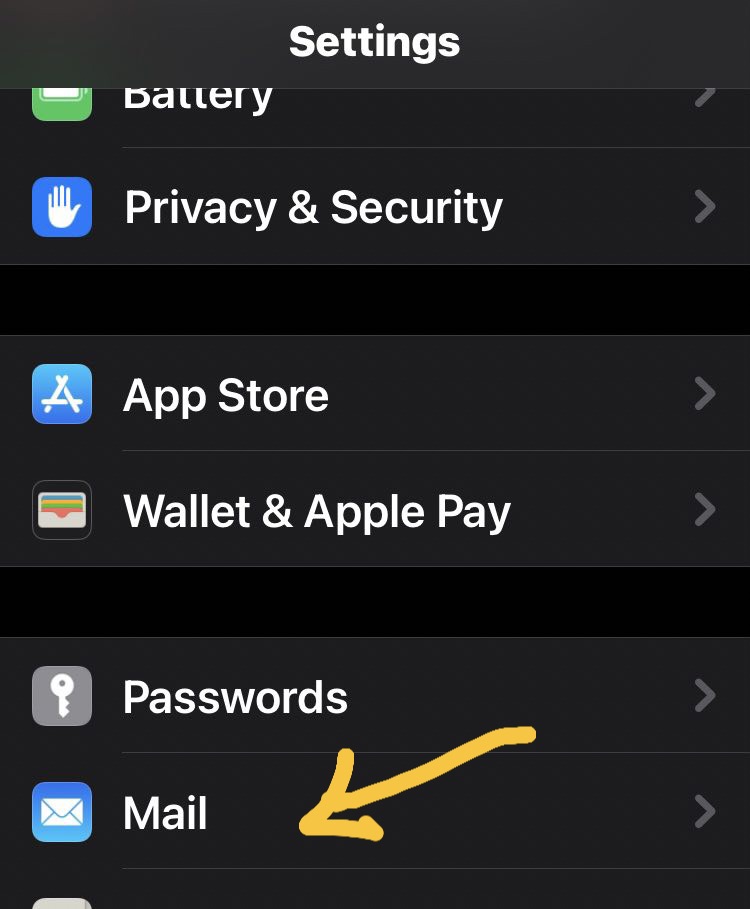
Step 2 – Click Mail:


Settings: Mail

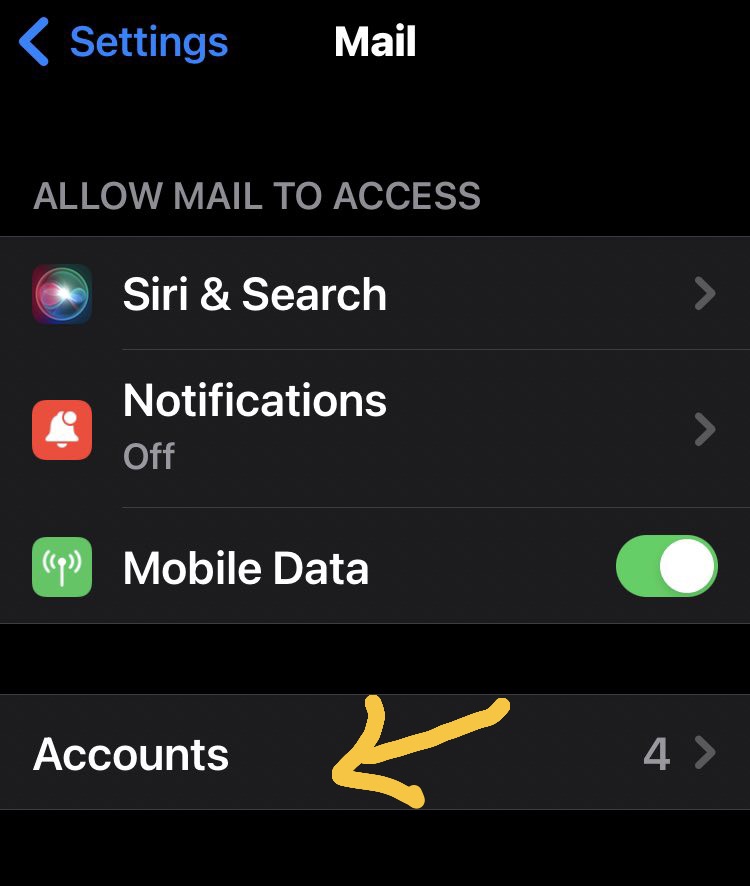
Click on Accounts:

Setting Email iPhone-Accounts

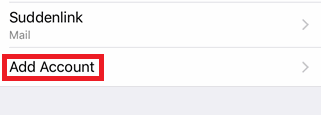
Step 3 – Click on Add Account.

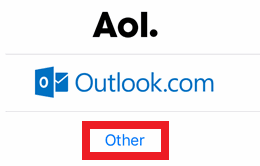
Step 4 – Select Other.

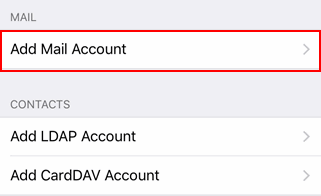
Step 5 – Select Add Mail Account.


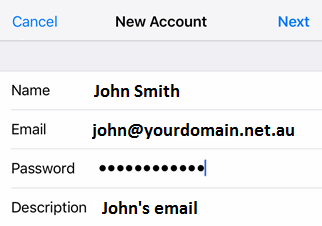
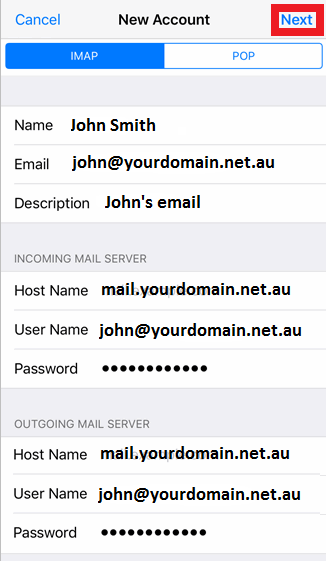
Step 6 – Add your personal details.

Step 7 – Add your mail settings. Click Next to complete the setup.

Note: The User Name and Password for Outgoing Mail Server are NOT optional and must be entered.

Step 8 – Test the email account

by sending an email from / to your email address (e.g. from john@yourdomain.net.au to john@yourdomain.net.au). If this device can receive mail, the incoming server settings are correct. If the device can send mail, the outgoing server settings are correct as well.


Categories
IT Blog

Easily move an email account from one cPanel server to another

Moving an email account (including old emails) from one cPanel server to another is pretty easy to do yourself if you have some knowledge of cPanel and FTP.

I will be using the terms OLD SERVER and NEW SERVER a lot in this article. Below are the definitions:

OLD SERVER = Server that the email account is currently on and will soon be moved from

NEW SERVER = Server that you want to move the email account to

Step 1: Create a new email account on the NEW SERVER with the same address and password

You can do this by going into the cPanel on the NEW SERVER and click on Email Accounts.

Step 2: Download the files off of the OLD SERVER

FTP onto the OLD SERVER and download the files needed. From the root directory, go to “mail/domain.com/emailAccount”. Here you will see a bunch of files. All you really need to copy are the new and curdirectories.

If you have a lot of emails this could take a while.

Step 3: Transfer files to NEW SERVER

When the files are downloaded in step 2 place the new and cur directories in the “root/mail/domain.com/emailAccount” of the respective account on the NEW SERVER. The folder should already be created since you already created the account in step 1.

Go get some coffee. This step will take awhile as well.

Step 4: Reset Mail Quota

Now if you check the NEW SERVER you will see that your emails are transferred but your quota says 0/xxx MB. To update a wrong mail quota in cPanel: FTP to the OLD SERVER, open up the maildirsize file at“root/mail/domain.com/emailAccount” and copy all of the contents and paste them into the maildirsize file on the NEW SERVER.

You may have luck copying the maildirsize file on the OLD SERVER and pasting it on the NEW SERVER, however this did not work for me.

Step 5: Change DNS

If you followed all of the steps up to this point you should have all the files transferred, but you still need to point your DNS records to the NEW SERVER in order to have mail go there. When you update your records it could take up to 24 hours to take effect.

Step 6: Test