Categories
IT Blog

Add your logo to the Payment Review Page to give it a professional look

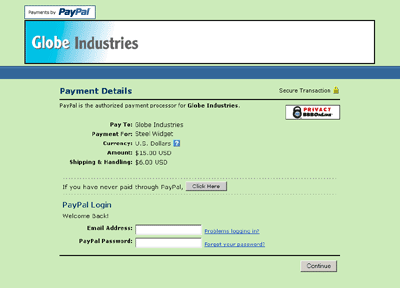
Change Header of your PayPal Payment Page
By default, your PayPal login name, which is your email address, appears at the top of your PayPal payment page. You can change this to be any image that is hosted online, such as your organization’s logo, using the image’s URL. The maximum size of 190 pixels wide by 60 pixels high.

To add your logo or other image to the PayPal payment page:

1. Log into your business PayPal account.

PayPal_Sign-in

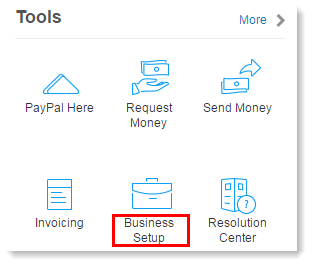
2. Click the “My Business Setup” link.

PayPal_Tools_BusinessSetup

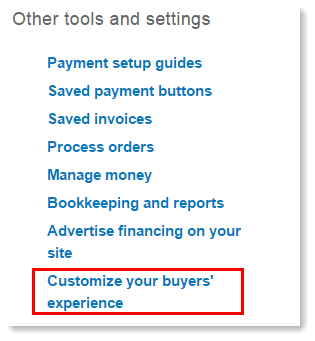
3. Under the Other tools and settings column, on the right, click “Customize your buyers’ experience”.

PayPal_Customize_Experience

4. Under Add Your Business Logo click “Create”.

PayPal_Logo_Create

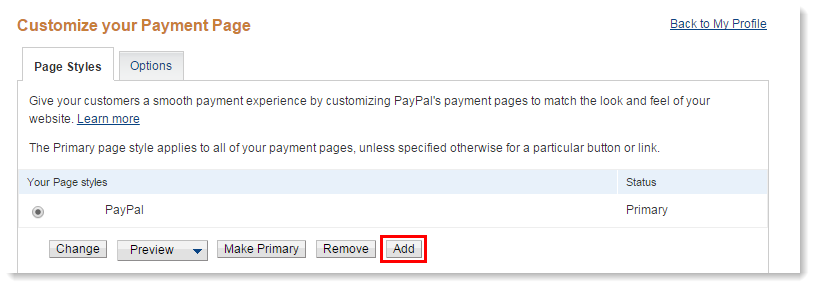
5. Click Add on the Page Styles tab.

PayPal_AddURL

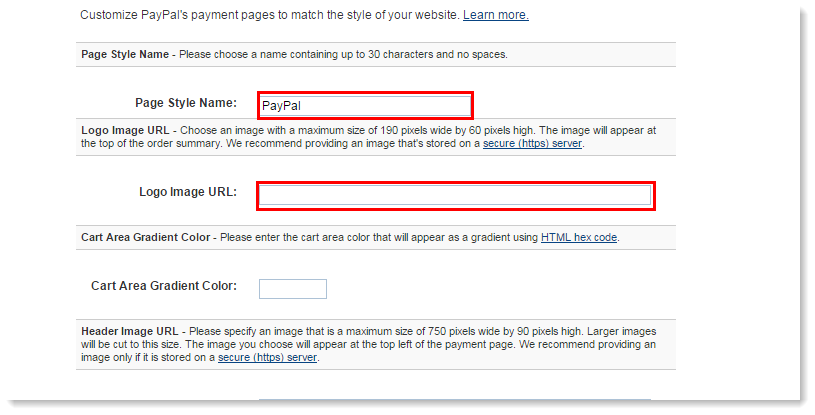
6. Give your page a new name (if you want) and add your image’s URL in the Logo Image URL box.

PayPal_logoURL

7. Use the Preview button to check how your new page will look.

PayPal_Preview_CustomChanges

8. Click Save when you’re finished.

Categories
IT Blog

Real time freight quotes in your site’s checkout

api

The ‘Smart API’ solution makes it easy for your customers to view ‘real time’ freight quotes in your site’s checkout.

It enables a quick, seamless transaction which includes the freight charge when your customer purchases goods from your website. Enabling this solution to your site also cuts down on queries from customers requesting freight charges for delivery to their location. The features of the Smart Send ‘Smart API’ are:

  • Road or ‘Express’ freight options
  • Pricing up to 20 items per quote
  • Transit Time option based on service chosen (quoted as ‘business days’)
  • ‘Receipted Delivery’ option
  • ‘Tail-Lift Truck’ option – this can be chosen if the item is heavy or large/awkward and enables the goods to be easily loaded/unloaded at pickup or delivery)
  • ‘Transport Assurance’ – the ability to cover goods against loss or damage in transit
  • Tracking option – enables your customers to call up ‘tracking’ information (after the goods have been despatched) by entering a consignment number on your website
  • Automated booking process with Smart Send (no need for merchants to re-enter buyer address/contact details when completing a freight booking)

(from https://www.smartsend.com.au/)

Categories
IT Blog

How to Create an Image Gallery in WordPress

First thing you need to do is to create a new post. Alternatively if you want to add the gallery to an existing post, then click to edit that post. Once you are on the post edit screen, you need to click on the Add Media button.

addmediabuttonposts

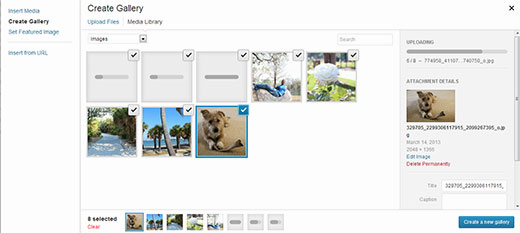
This will open the WordPress media uploader. Now you need to click on Create Gallery link that you see on the left side of the screen. To add images to the gallery, you can either upload the images from your computer or choose existing images from your media library (images that you have previously uploaded to your site). All you have to do is select the images you want by clicking on them. This will add a checked mark that you see on each image in the screenshot below.

gallery-image-upload-progress


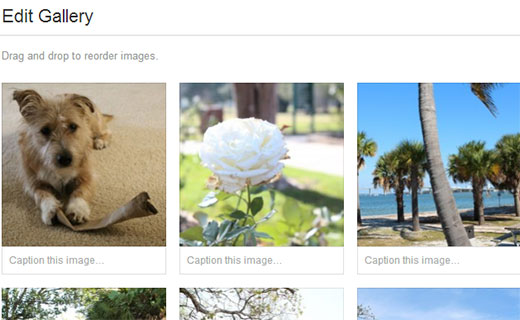
Once you have selected all the images that you want to add in your gallery, click on “Create New Gallery” button in the media uploader. Media uploader will then show your selected images in the Edit Gallery view. Here you can add captions to your images, change gallery settings, and rearrange the order of images by simply dragging and dropping them in the order you want them to appear in. When you are done with editing the gallery, click on the Insert Gallery button.

edit-gallery-view

Clicking on Insert Gallery button will close the media uploader and insert the gallery code inside your WordPress post.

Categories
IT Blog

What is SSL and why is it important?

What is SSL?

SSL (Secure Sockets Layer) is a standard technology behind establishing an encrypted connection between a web server (host) and a web browser (client). This connection between the two makes sure that all the data passed between them remain private and intrinsic. SSL is an industry standard and is used by millions of websites to protect their online transactions with their customers. If you have ever visited a website using the https:// in the address bar you were creating a secure connection via SSL. If you have an eshop or sell items via your website, SSL helps in establishing trust with your customers.

Understanding how the SSL connection protects your data

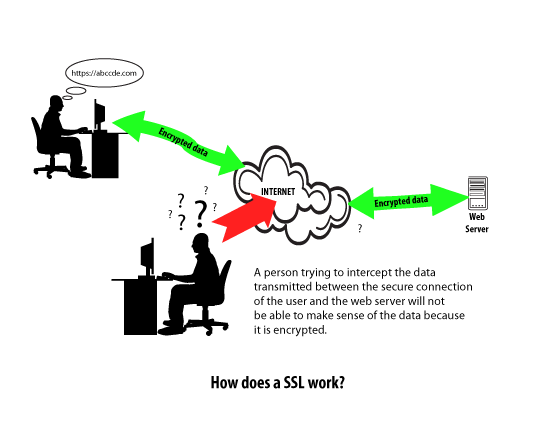
Using an SSL certificate creates an encrypted connection between the user’s web browser and the web server. This means that any data transmitted between the web server and the web browser can not be read without first being decrypted. This protects the data from being spied upon by someone else on the internet because they will not be able to understand the encrypted data.

secure-ssl-connections

There a few basic steps that occur when you attempt to establish secure connection. Here’s a summary of the steps:

  1. You type in or select the secure URL (e.g. “https://example.com”)
  2. The web server receives your request and then submits a reply that attempts to establish trusted connection between the web browser and the web server – also called the “SSL handshake.”
  3. After the SSL certificate is verified through the SSL handshake, the data transferred between the web server and web browser is encrypted to keep it private and secure.

How to tell if a site is using SSL

While the details of the SSL protocol are not displayed to the visitor, most browsers will display a lock or some other form of identification in the address bar. This will indicate if you are currently protected by an SSL encrypted session. If you would like the details of the SSL certificate you can simply click on the lock.

What does the SSL mean to visitors?

Most SSL Certificates contain the domain name, company name, address, city, state, and country. It also contains an expiration date of the certificate and the details of the Certificate Authority (the company who issued the SSL). When a browser attempts to establish an SSL connection to a website it checks to make sure the certificate is not expired, has been issued by a trusted authority, and is being used for the correct website. If any of these checks fails your web browser will display a warning letting the user know that the site is not secured by SSL.

Categories
IT Blog

10 Benefits of Using WordPress to Power Your Company’s Website

word-press-benefitsWordPress has been around since 2003 and is the most popular blogging software on the market. Over the last few years, WordPress has also become the content management software of choice for non-blogging websites. Here are the top 10 reasons why WordPress is so popular and why you might want to consider switching to a WordPress platform for your company’s website.

1. Ease of Use

WordPress is very easy to use and has an intuitive interface. Adding new pages, blog posts, images, etc. on a regular basis is a breeze and can be done quickly. Because the technology is so simple, time spent on formatting is greatly reduced.

2. Manage Your Website from Any Computer

WordPress is browser-based. You can login from any Internet connected computer and manage your site.

3. No HTML Editing or FTP Software Required

WordPress is a self-contained system and does not require HTML editing software (such as Adobe Contribute or Dreamweaver). You can create a new page or blog post, format text, upload images (and edit them), upload documents, video files, image galleries, etc. all without the need for additional HTML or FTP software.

4. Search Engines Love WordPress Sites

The code behind WordPress is very clean and simple, making it easy for search engines to read and index a site’s content. In addition, each page, post, and image can have its own meta tag keywords, description, and title, and be optimized for specific keywords, allowing for very precise search engine optimization. You can also use tags to further enhance your search engine optimization efforts.

5. You Have Control of Your Site

No more waiting for your web designer to make simple updates to your site. With WordPress, you have control of nearly every aspect of your site and can easily make those simple updates yourself.

6. The Design of Your Website is 100% Customizable

WordPress acts as the engine for your website. The look and feel of the site can be 100% customized so your brand can shine through on your site and provide a unique experience to your visitors.

7. A Blog is Built-in and Ready to Go

Since WordPress was originally created as a blogging platform, blogging capabilities are built-in and are easy to integrate, if desired. Setting up RSS / email subscriptions to your blog, commenting capabilities, and automatically adding the most recent blog posts to other pages of the site (your home page, for example) are also very simple to set-up, and help to extend your company’s reach and make your site more dynamic and interactive.

8. Extend the Functionality of Your Site with Plugins

Want to add an event calendar, video gallery, Twitter Feed, Facebook Fan Box, and more to your site? WordPress makes this possible with plugins, most of which are free or very reasonably priced.

9. Your Site Can Grow as Your Business Grows

WordPress sites are very scalable. You can have hundreds of thousands of pages or blog posts on your site and the performance of the site will not be compromised in the least.

10. Have Multiple Users

As an administrator of a WordPress site, you can set-up multiple users for the website and assign access levels and capabilities to each user.

Categories
IT Blog

Benefits of having your own domain email

What is a Professional Email?

A professional email is the one that has your business name in it. For example support@yourdomain.com is a professional email rather having yourname@yahoo.com, yourname@gmail.com, yourname@bigpond.com … looks amateurish

Put your company name in front of customers & prospects, suppliers, vendors and partners with every email you send.

Your domain is a key to building your company brand & your email address is just as critical. When your email address is your company name, you are marketing your business with every

Name Recognition & Branding

Having your own domain email is an easy way to promote your company. Your prospects see your name with every email. The more they see your name, the more they’ll think of you and the easier it is for them to remember you.

Customer Trust

Consistent marketing builds trust, and so does meeting your customers’ expectations. They expect to see your domain name after the @ sign in the email. It says you’re professional and operate an established business.

Easy to Find You Online

Customers will type in the domain part of your email address (the part that comes after the @ sign) to find you online, often when they’re ready to buy. If your email says gmail.com or hotmail.com at the end, they can’t easily find you. And if they can’t find you, they can’t buy from you!

You, Not Your ISP, Own Your Email Address

Your email address stays with you. You don’t have to change it if you move or change your Internet Service Provider (ISP).

Save Money on Marketing Materials

You won’t need to reprint your business cards, letterhead, signage or other marketing materials if you move or change ISPs or web hosts. You own the email address and it goes where you go.

Build Marketing Momentum

You’ll build marketing momentum by using a consistent email address that doesn’t change over time. Old customers can easily reach you again.

Categories
IT Blog

Half of small businesses still without a website

More than a decade after the emergence of the e-commerce industry almost half of Australian small-and medium-sized businesses still do not have a website, according to an industry survey.

The share of SMBs with a website rose from 35 to 52 per cent in the past year, the remain businesses without a website risk losing consumers who are increasingly turning to the internet for shopping and information.

“Having a website is as important for a business today as having a phone,” said Claire Hatton head of local business for Google Australia, who commissioned the poll. “Millions of Australians are looking online for local business information, and yet almost half of Aussie businesses are invisible to them, because they don’t have a website.”

The internet, which increases the reach of small business, has begun to dispel the dominance of major bricks and mortar retailers as many struggle to adapt their business models for an online environment, leaving a gap for internet-savy small businesses to fill.

As retail trade weakened through 2011, consumer saving increased and spending shifted to more services and online purchases. Last year was the worst for retail sales since 1984, according to Australian Bureau of Statistics data.

To tap into one of the largest areas of business in the Australian economy and reach new customers, large web search and social media companies like Google and LinkedIn have increased their focus on small businesses.

LinkedIn, whose membership topped three million Australians this month, has created a small business hub on its website that lets business professionals swap information and expand their influence among peers.

“By participating in LinkedIn Groups and Answers, SMBs are gaining industry insights and positioning themselves as subject-matter experts,” said company spokeswoman Tara Commerford.

Using business-focused social media allows “small businesses to build their online brand, network with other professionals, generate new business leads and hire talent,” said Ms Commerford.

The Google survey, covering the small and medium business sector, was conducted by TNS in February.

Chris Zappone

Reporter, Business Day

http://www.smh.com.au/small-business/smallbiz-tech/half-of-small-businesses-still-without-a-website-20120322-1vlf4.html#ixzz2AwiulxQk

Categories
IT Blog

Have You Got A Mobile Website?

Categories
IT Blog Setup email

How to setup Outlook 2010 to access your business email

This tutorial assumes you’ve already launched Outlook 2010.

Example:

Name: John Doe
Email is john@mybiz123.net
password is xxxxxxx

Email client setting up information:

Username/Email: john@mybiz123.net
Password: xxxxxx
Incoming Server: mail.mybiz123.net
IMAP Port: 143
POP3 Port: 110
Outgoing Server: mail.mybiz123.net
SMTP Port: 587
Leave Message on server: 15-30 days
Authentication is required for IMAP, POP3, and SMTP.

You have to replace

john@mybiz123.net by your real email

mybiz123.net by your real domain name 

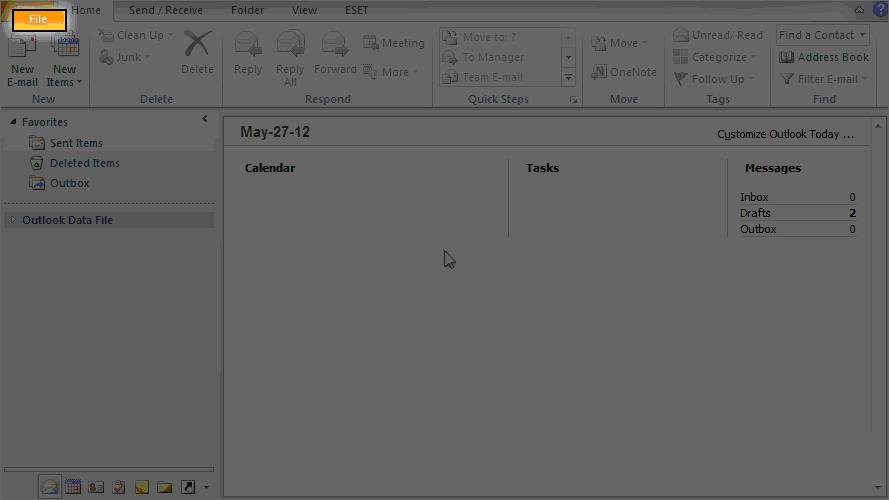
1) To configure a POP email account, first click the “File” tab.

Setup MS Outlook 2010 to access email Step 1

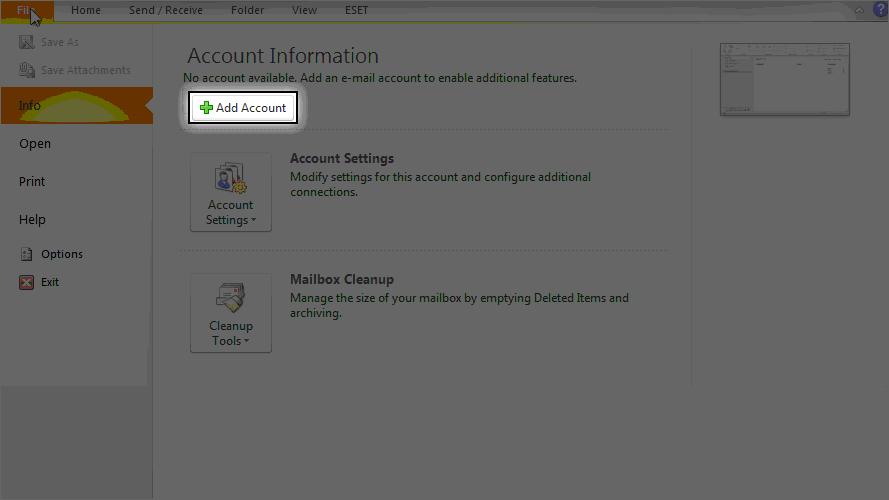
2) Then click The “Add Account” button.

Outlook 2010 to access your business email step 2

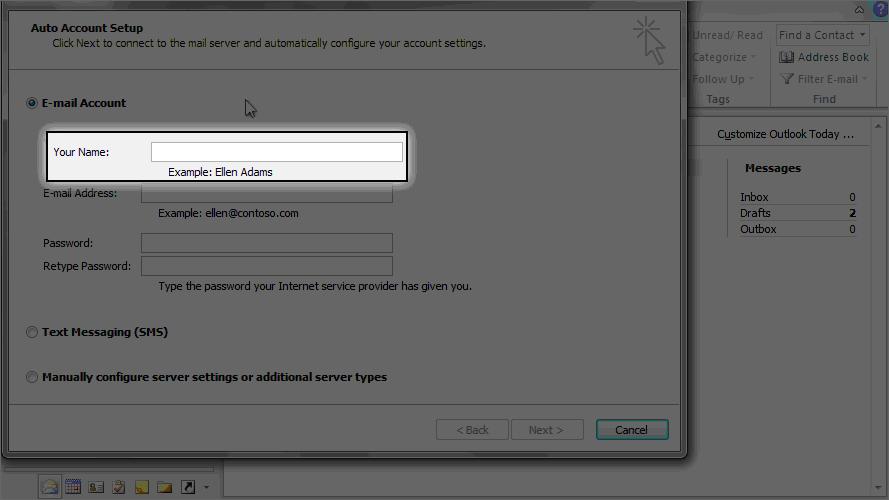
3) Enter your name as you would like it to appear in your emails.

Outlook 2010 to access your business email

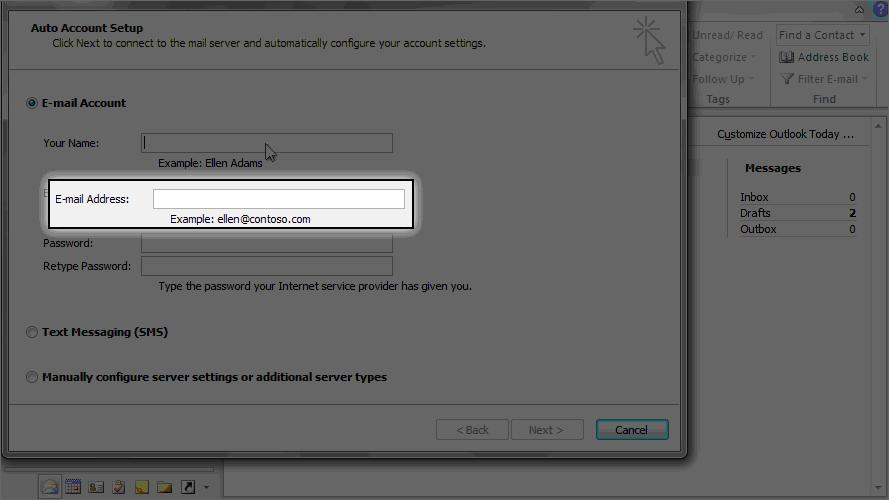
4) Then enter the email address you want to configure here.

Outlook 2010 to access your business email step 4

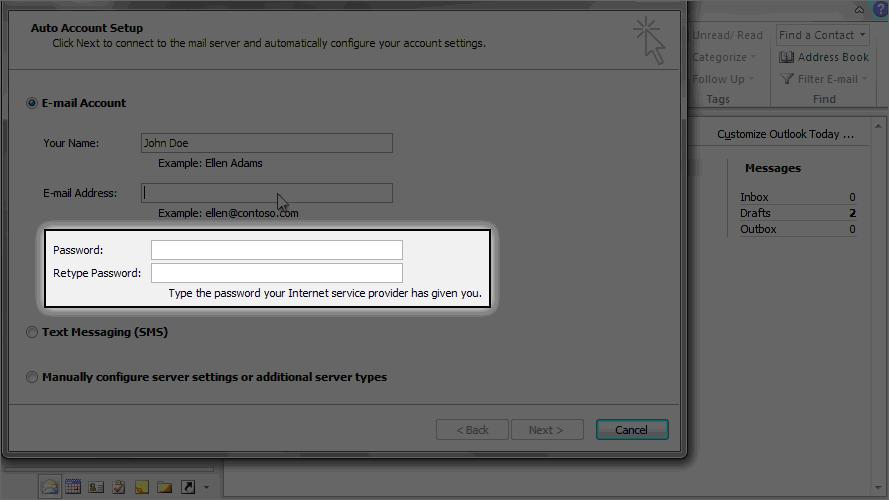
5) Enter and confirm the email account’s password.

Password = The password that was set for the account when it was created in cpanel


Outlook 2010 to access your business email

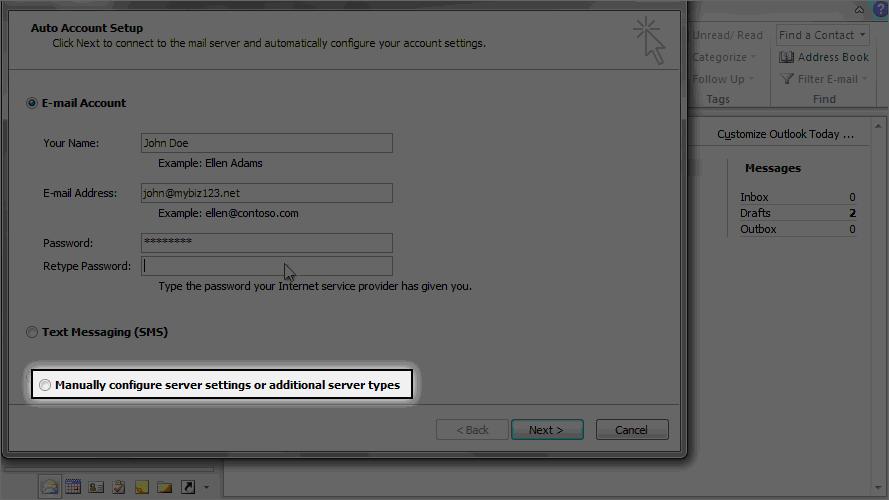
6) Click here to manually configure your mail server settings.

Outlook 2010 to access your business email step 6

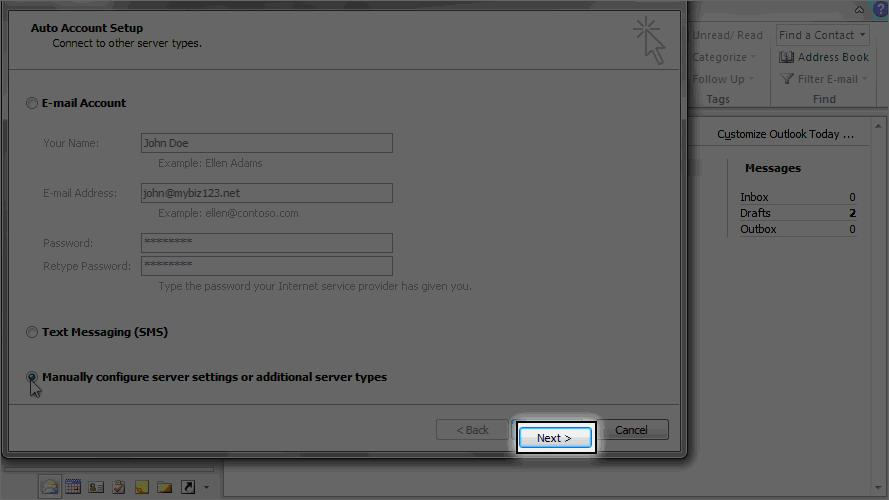
7) Then click “Next”.

Outlook 2010 to access your business email step 7

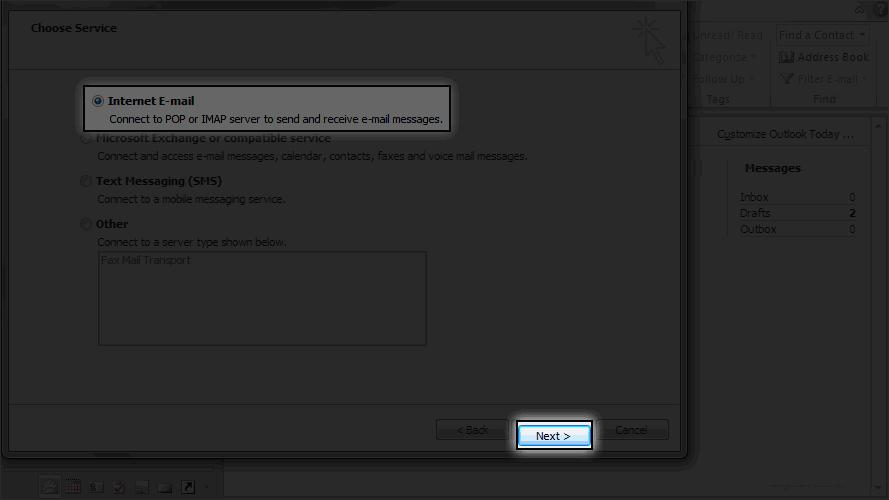
8) Ensure the “Internet E-mail” option is selected, then click “Next” again.

Outlook 2010 to access your business email step 8

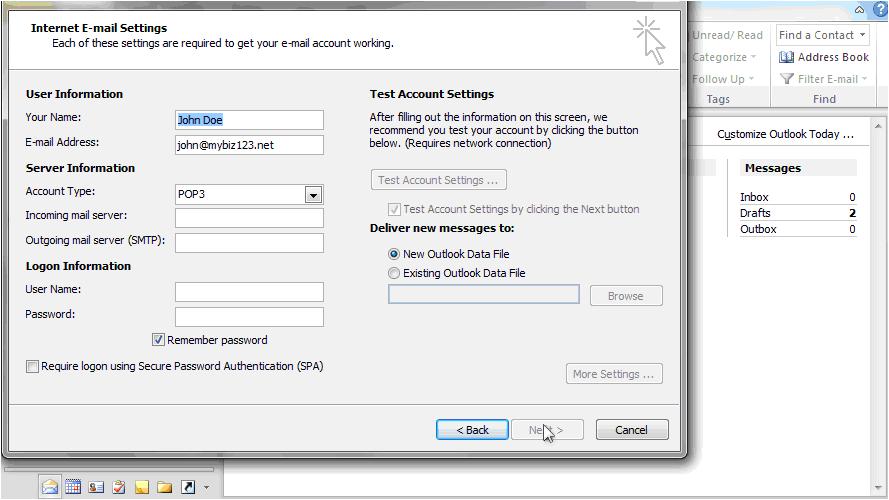
Next we have to configure our server settings.

Outlook 2010 to access your business email step 8 continued

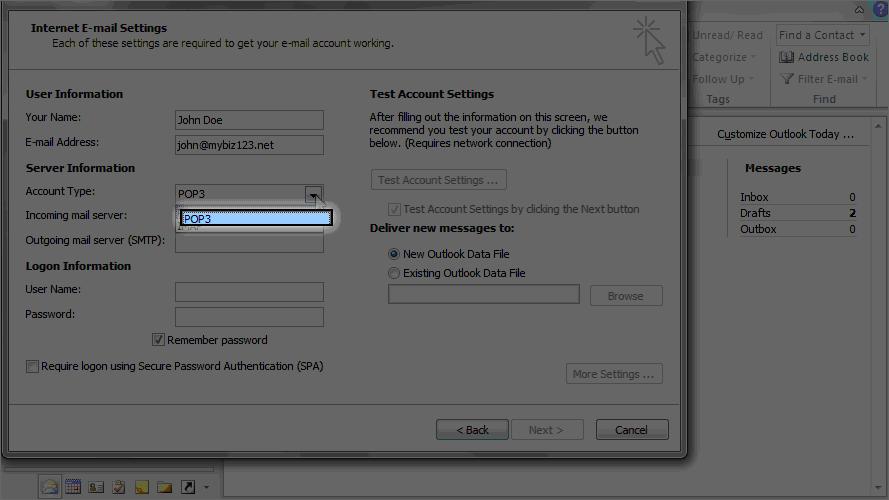
9) Ensure “POP3” is selected as the account type.

Outlook 2010 to access your business email step 9

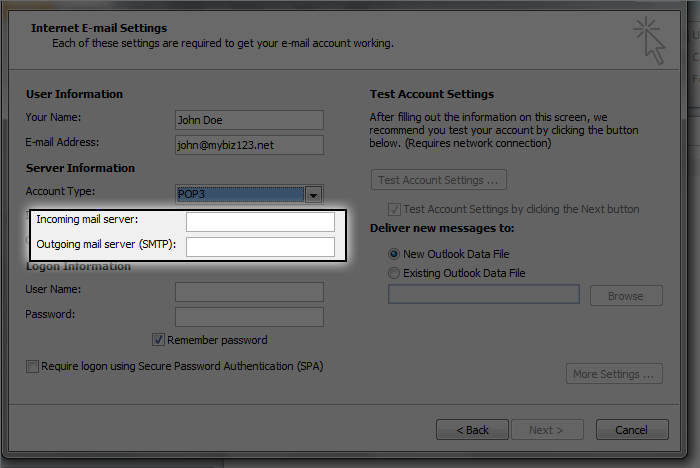
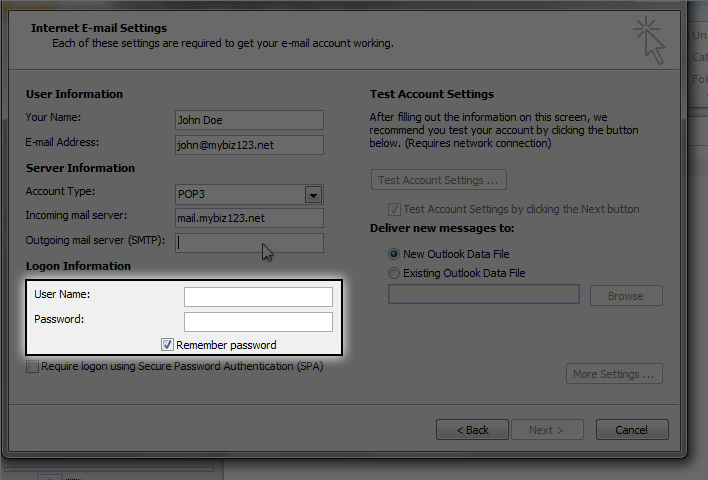
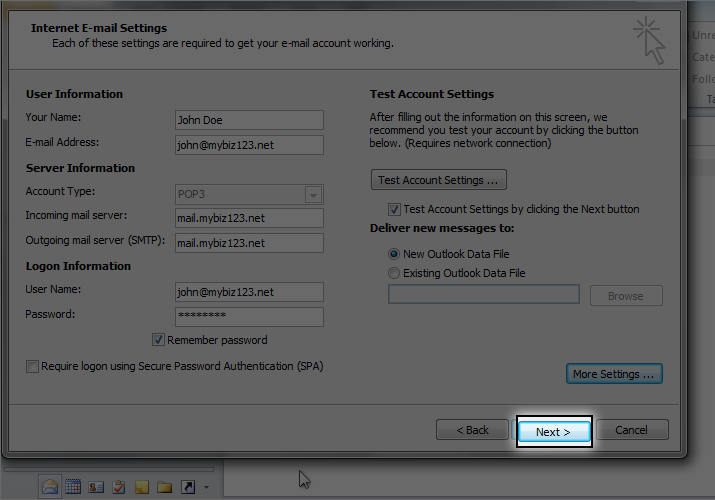
10) Then enter the incoming and outgoing mail server addresses.
Incoming mail server = mail.<yourdomain>
Outgoing mail server (SMTP) = mail.<yourdomain>

scene13_1

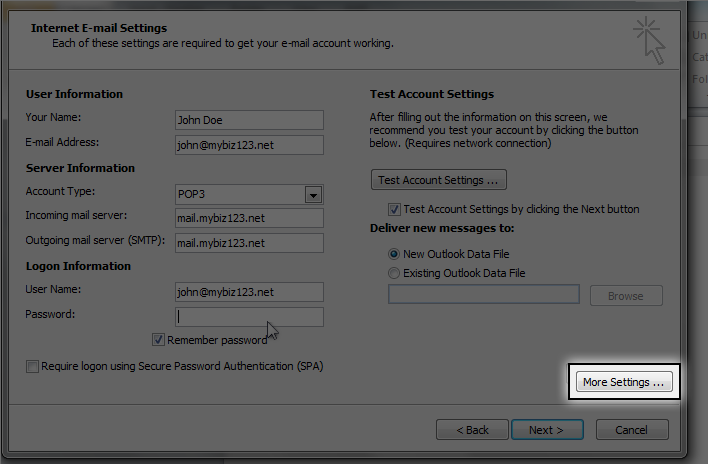
11) Enter your full email address as the user name, and the password.

scene15_1

12) Then click the “More Settings” button.

scene17_1

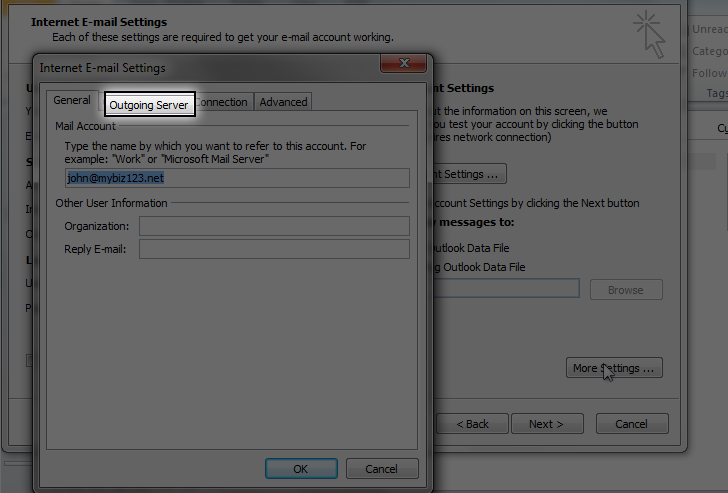
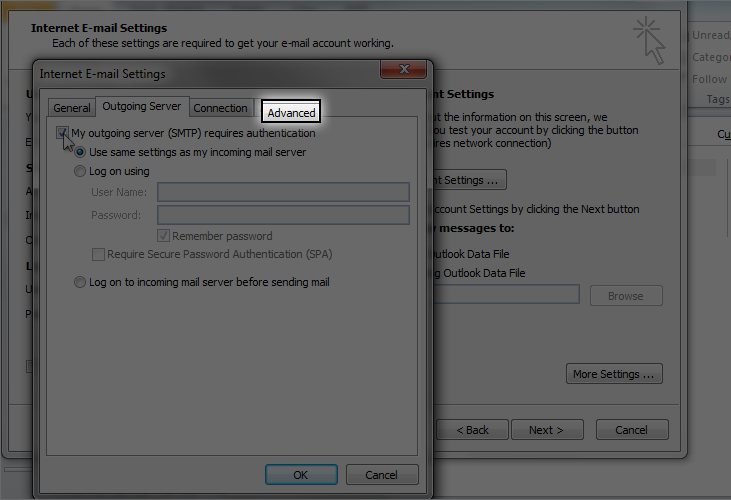
13) Click the “Outgoing Server” tab.

scene18_1

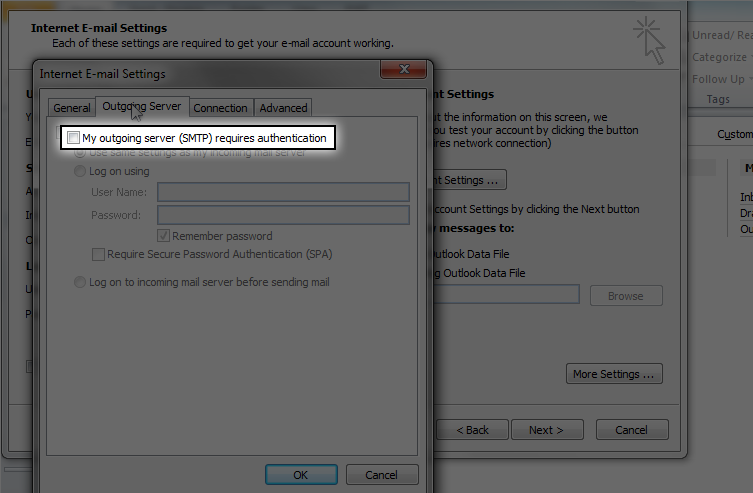
14) Then click here to require outgoing server authentication.

scene19_1

15) Click the “Advanced” tab.

scene20_1

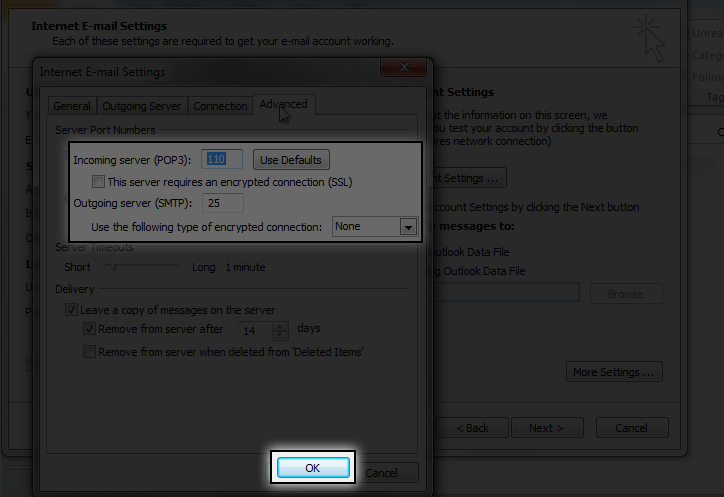
16) If you need to change your server port numbers you can do so here… otherwise just click “OK”.
Outgoing server (SMTP) change to 587

scene21_1

17) Click “Next”.

scene22_1

That’s it! The email account has been added.

scene28_1